
How to Set Up Conversion Funnels in Google Analytics | Ultimate-Guide
This guide shows you how to set up targets and conversion funnels with Google Analytics & the Google Tag Manager.
That awaits you
- What is a goal in Google Analytics?
- What is a Conversion Funnel?
- What do I have to pay attention to with the Conversion Funnel?
- How do I set up a goal and conversion funnel in Google Analytics?
- How do I trigger page visits or events for the Google Analytics Conversion Funnel?
- How do I measure conversions with the Conversion Funnel from Google Analytics?
- The Google Analytics goal or the Conversion Funnel does not work
- What are the alternatives to Google Analytics for conversion funnels?
1. What is a goal in Google Analytics?
An important principle in marketing activities: No marketing activities and analyses without a concrete goal.
The target action in Google Analytics is a central functionality that helps you to check your goals of your marketing projects and to fine-tune them if necessary. They are therefore the prerequisite for the success control of your goals.
Possible goals can be:
- Increase the reach of your website
- Increase in the number of website contacts
- Increase the number of newly registered users in your web or mobile app
- Increase the number of subscribers to a newsletter
A goal tracks how often users perform certain completed actions from your website or Web App. The completed action is often called Conversion. The conversion term described Ryte very well in their Wiki article.
In Google Analytics there are different types of goals:
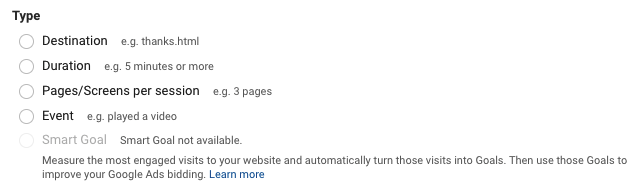
📍 Goal type Destination
The user calls up a specific target (usually a page). This is the easiest target to track.
Caution: The Conversion Tunnel can only be mapped with the Destination goal type.
Example: The user is redirected to the "thank you.html" page after he has registered for the newsletter. If the user reaches this page, the conversion is complete.
📍 Goal type Duration
The user has reached a certain duration at his session, which was reached as a limit value. This type is one of the so-called soft conversions. The value alone does not say much. This value becomes interesting if you work with different segments and compare for example different user groups and their behaviour.
Example: The user stays on the website or app for at least 2 minutes.
📍 Goal type Pages/Screens per session
A user looks at a certain number of pages. This type also belongs to the so-called soft conversions. These target projects also serve to identify user segments in order to find out how many page views are highly likely to lead to the target or a conversion.
Example: The user is looking at at least 5 pages of our blog.
📍 Goal type Event
The user has triggered a certain event by his action.
Example: The user has started playing a video.
📍 Smart Goals
Investigate smart goals, thanks to machine learning, where the conversion probability is highest. All sessions will be evaluated and the most promising ones will be used for the Smart Goals. Factors to be considered are: session duration, pages per session, location, device and browser.
In order for the smart goal to be used, the following conditions must be met:
- Google Analytics and Google Ads account is linked
- The ads in the linked Google Ads accounts have generated enough traffic and this has resulted in at least 500 analytics sessions in the past 30 days. If the number drops below 250 for that period, smart targets will be disabled until the 500 target is reached again.
- A maximum of ten million sessions may be broadcast in a 30-day period.
- The Google Products and Services option must be enabled under "Data Sharing Settings" in your Analytics account.
Example: The website or app operator has no conversions and uses smart goals to identify the best sessions as conversions.
👉 Little Data has created a good Blog-Post about the Smart Goals.Google Analytics already offers different templates for the different types of target actions, such as increasing sales, engagement, inquiries or aquisition. More about this when setting up.
2. What is a conversion tunnel?
A conversion funnel describes and visualizes the stations or phases that a user goes through until conversion. The Conversion Funnel is an important element in the analysis and optimisation of website or web and mobile app processes.
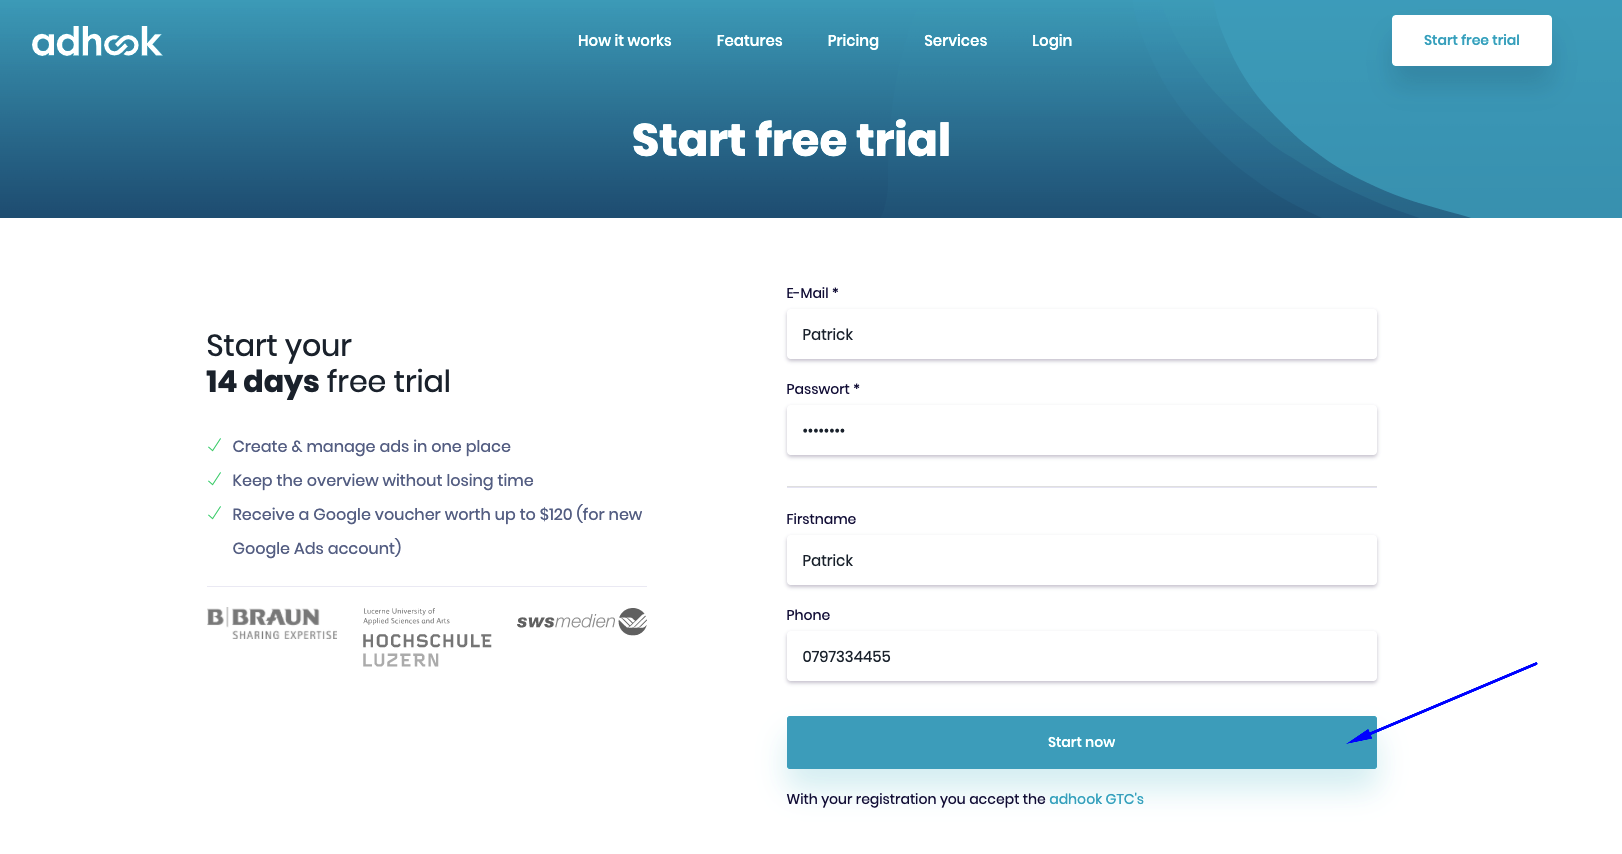
📍 Example Scenario "Starting Free Trial"
At Adhook we have designed different Conversion Funnels. As Micro-Conversion we have defined the registration into the test phase. Thereby a user goes through the following phases:
👉 Visit the landing page 👉 Button "Start Free Trial" 👉 Send registration
1. Visit the Landing PageThe user lands on the website. The user may have reached the website directly, through SEA or SoMe campaigns, the search or other channels. We track the entry on every page here.
 2. Click on the button "Start Free Trial" to go to the registration page for the free test phase
The user switches to the page for the Registration for the free trial.
 3. The registration for the free trial
The user enters his login data and registers for the free trial.
In Google Analytics, the mapping of these phases or this conversion funnel looks as follows.
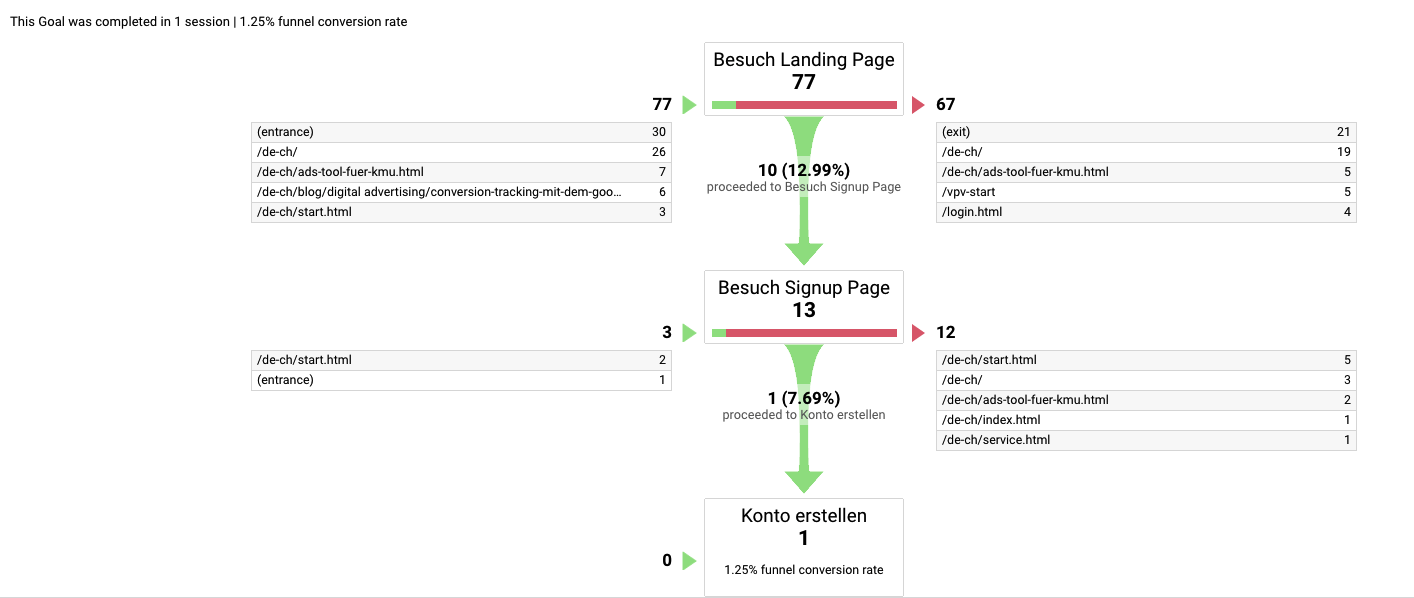
We have illustrated different conversion tunnels. The example above is a micro-conversion, which consists of only three steps. We have, for example, created another target project, which goes from visiting the landing page to depositing the means of payment. The mapping of the conversion-funnel brings us the following advantages:
- Measurability of marketing activities: We can examine the effect of marketing activities on different channels and determine which channels and activities have a particularly good impact on the defined target actions.
- Identification of potential for improvement in the onboarding process: We can analyze the optimization potential in our onboarding process and directly check the effects of appropriate adjustments.
- Transparency and verification of objectives: We always have the figures from the Conversion Tunnel at our fingertips, so it is always transparent for us to see where the potential bottleneck lies in the sales process and how we stand in relation to our set goals.
👉 SmartMarketingBreaks.eu describes the advantages of Sales Funnel very well in theirarticle.
3. What do I have to pay attention to with the Conversion Funnel?
At the beginning we had shown the "complete" funnel of a conversion. The conversion funnel comprises almost 20 steps and has covered the entire acquisition and onboarding process.
Especially when you start, it takes quite some time for individual users to go through this complete macro conversion tunnel. Therefore, it is recommended to display so-called conversion tunnels of micro-conversions in addition to an extensive macro-conversion tunnel and thus to distinguish between the two types of conversion.
📍 What is the difference between macro and micro conversion?
Micro-conversions refer to user steps or smaller commitments within a sub-process on a website or web/mobile app. Macro conversions refer to complete processes, such as a subscription or purchase. The following picture shows the difference:
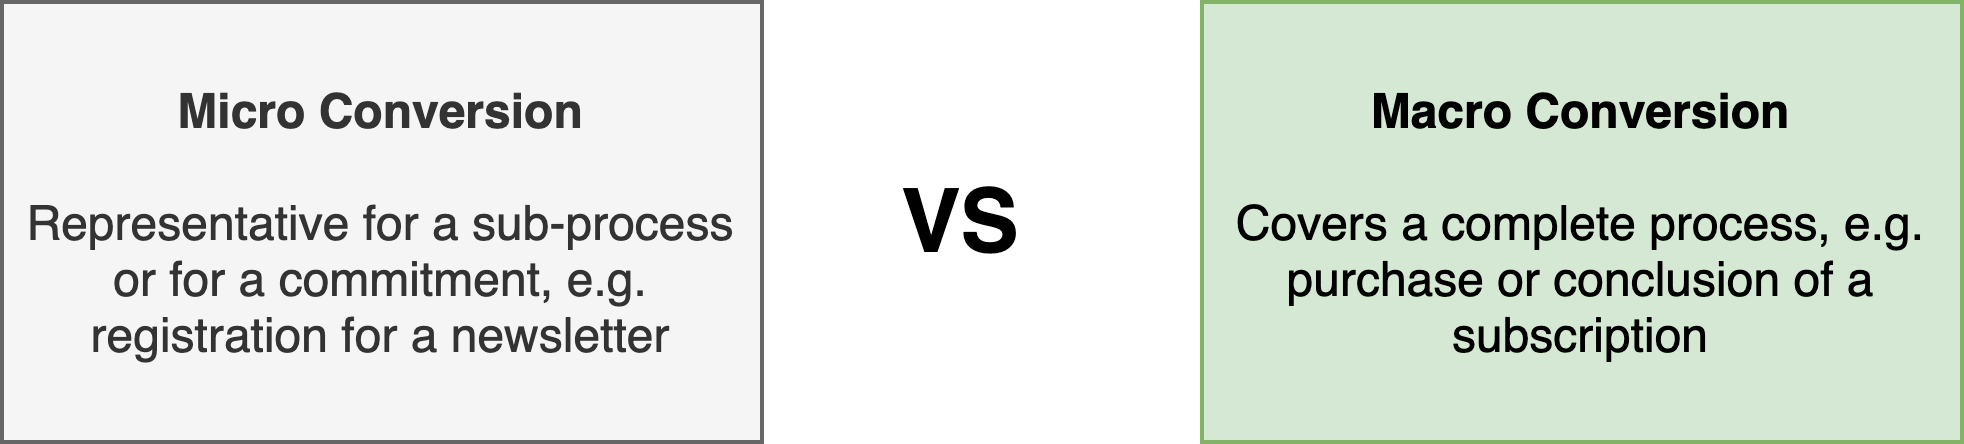
As an example for the difference you can take an online shop. If you map the complete funnel of a macro conversion in an online shop, you would track from the visit of the shop, the selection of products, the shopping cart to the order.
If one builds a conversion tunnel for the micro-conversion shopping cart, this only maps the user steps within the sub-process "The user has placed items in the shopping cart".
Possible example of micro-conversions:
- Editorial contributions: Page Views, Scroll behavior, Bounce rate
- Lead-Generation: Subscription to newsletter, mailing lists
- Downloads: Downloads of PDF files and/or whitepapers
- Apps: Registrations
Thanks to the definition of target actions for micro-conversions, the sub-steps in the sales process can be analyzed very specifically and thus improved continuously in an autonomous manner.
👉 Searchlaboratory.com has created a good Post about Macro- and Micro-Conversions.
4. How do I set up a goal and conversion funnel in Google Analytics?
So now we are ready to depict the first target and thus the first conversion funnel in Google Analytics.
As an example for the representation of the target project or the conversion funnel we take the presented example of the micro-conversion "Increase registration test phase" in Adhook.
First we define a target action in Google Analytics "Increase registrations".
- We open the Google Analytics account and switch to the management of the selected account.
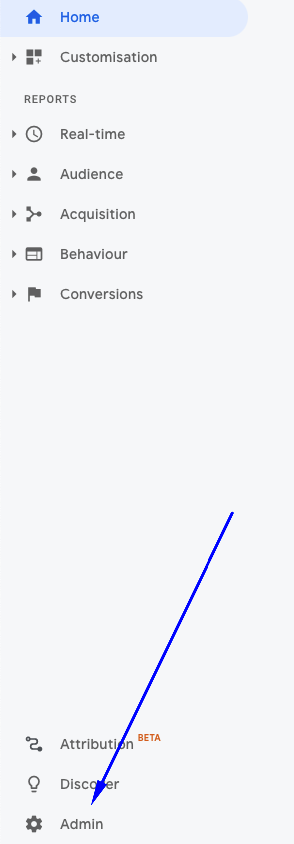
- The definition of goals is at the data view level. We open the menu item Goal.
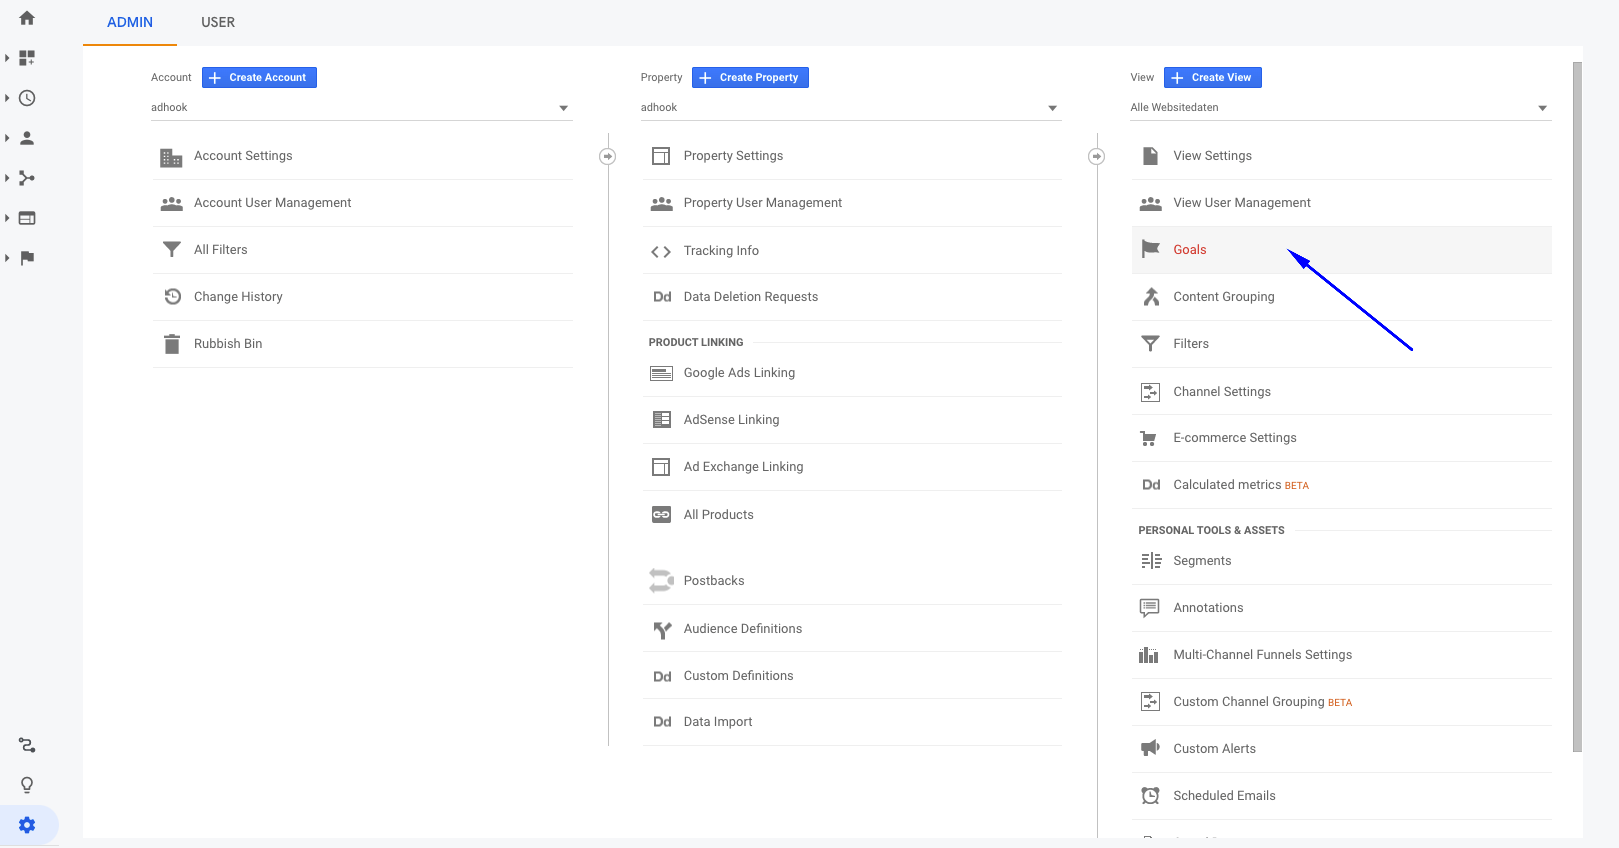
- To create a new goal, we click on "New Goal"

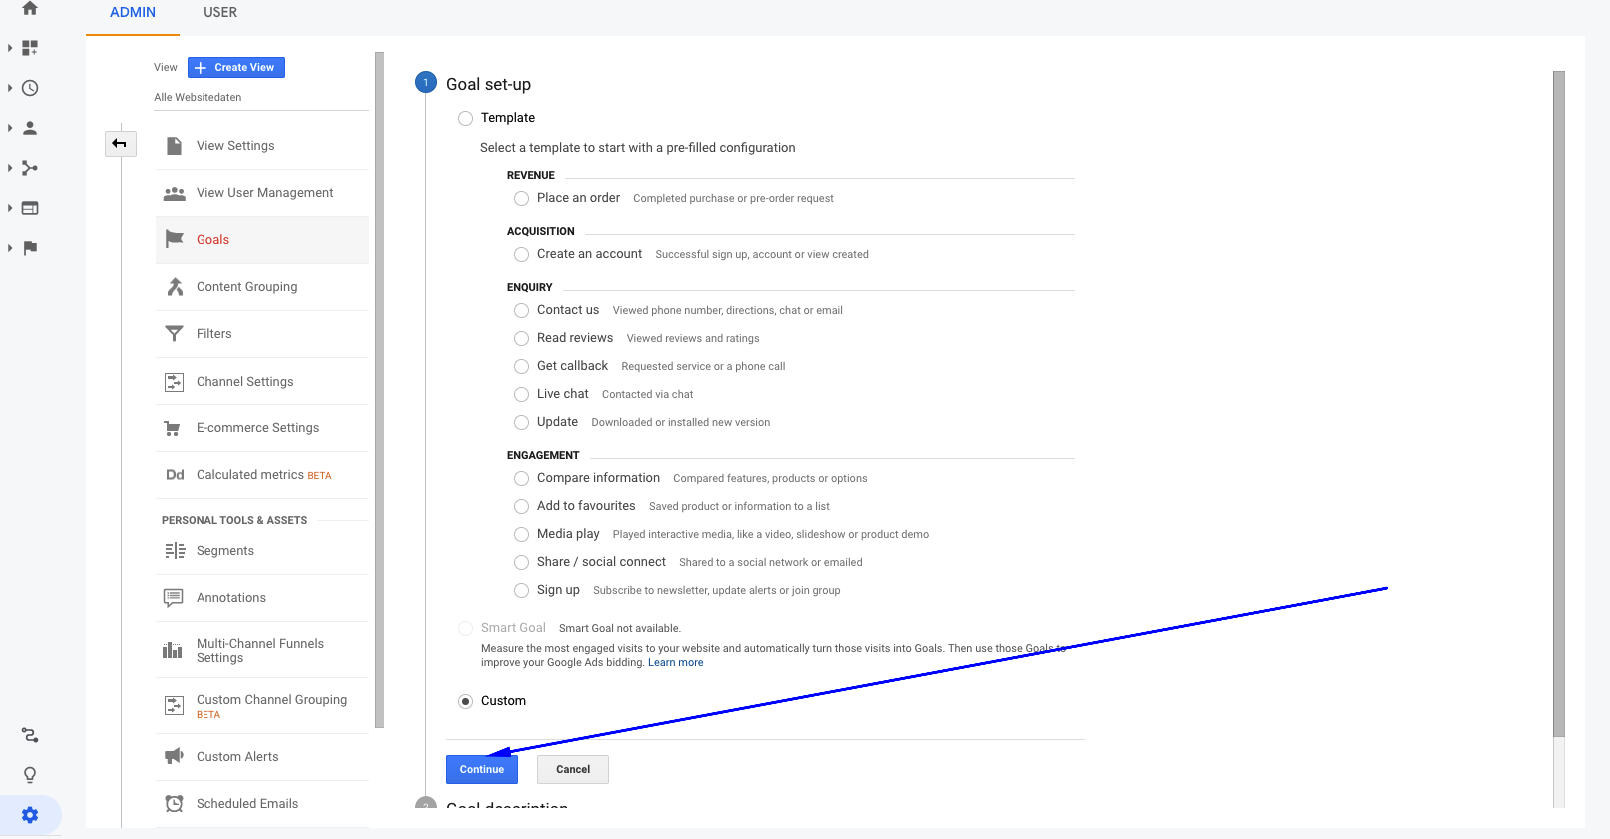
- We're setting up the target. This is about either choosing the right goal template or defining the goal in a user-defined way. In order to show the possible options, regardless of the template, in this article, we choose "Custom" when we set up the target. But of course you can also choose a suitable template directly.
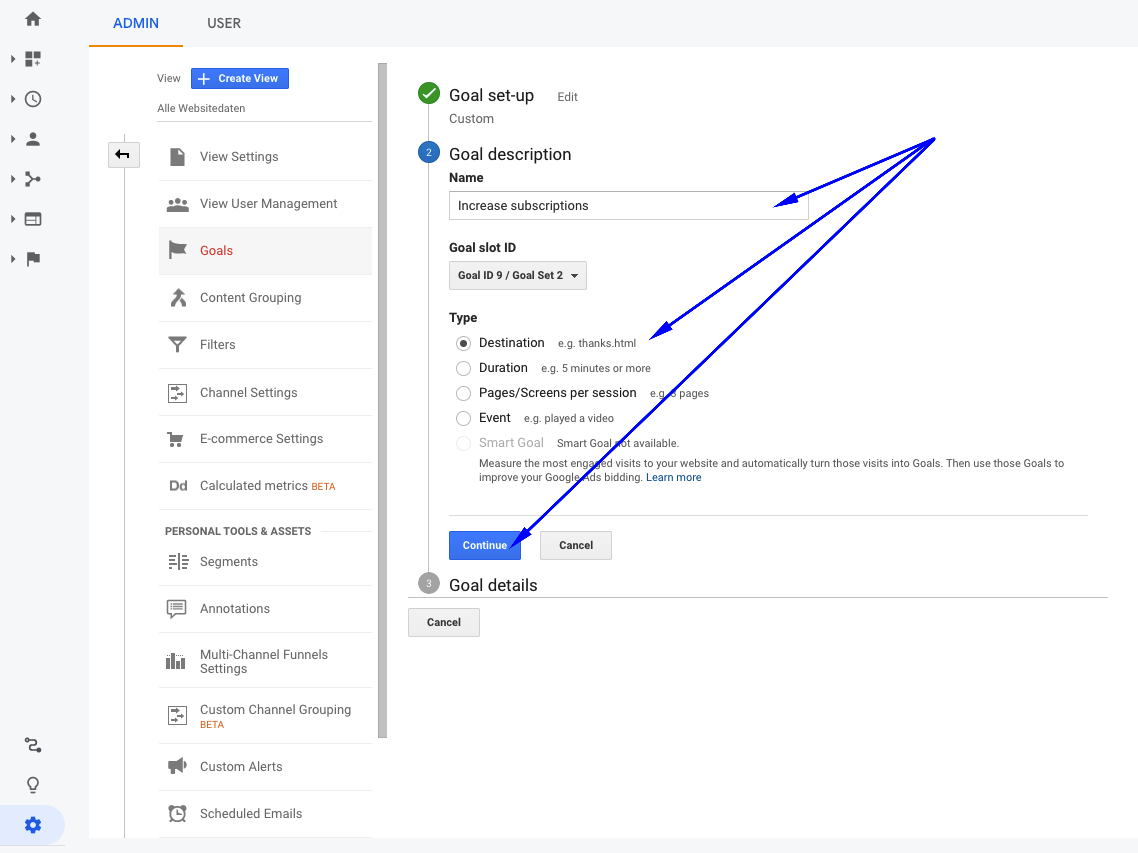
- Next, we need to describe the goal. Here the following attributes must be defined:
- Name of the goal: Serves to identify the goal in the Analytics account
- Goal-Id: Serves as storage location for the data of the defined goal
- Type: We have already described the types in detail in the upper chapter.
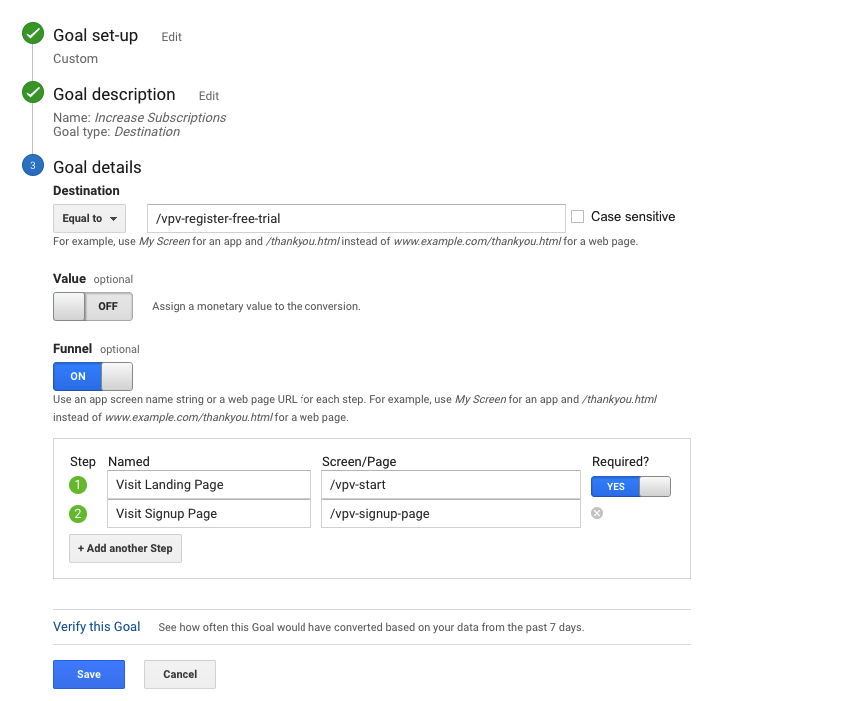
We choose the following values for the attributes of the goal:- Name of the goal: "Increase registrations"
- Goal-ID: "Goal-ID 1 / Goal Group-Id 1" (irrelevant to us for the moment)
- Type: "Destination" (since this is how the conversion funnel can be mapped here)
-
Next, the goal details must be defined. The following attributes must be defined:
-
Goal: Definition of the target page
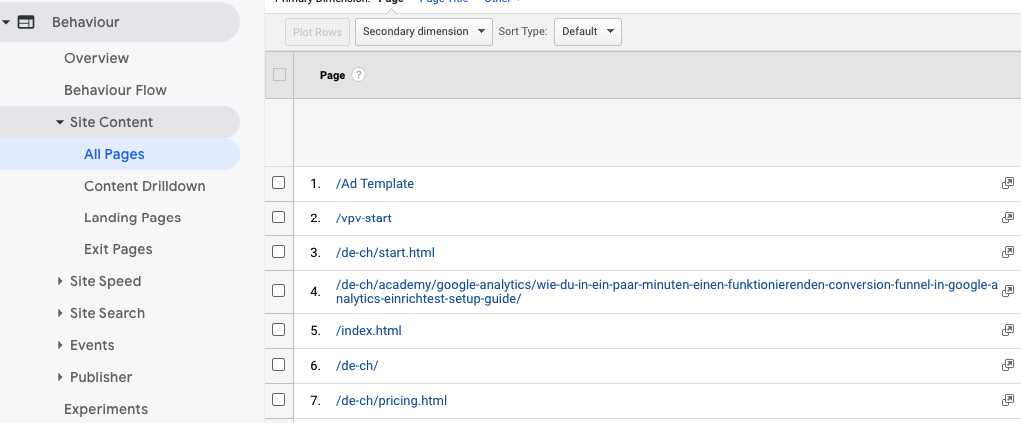
- Hint: If you don't know the conversion-relevant pages correctly, you can discover potential pages that deliver conversions under behavior → Website content → All pages.
-
The challenge in our scenario:
For the website we have partly static pages and partly dynamic views. For example, navigation from the landing page to the registration for the test phase is done via static pages, whereas the registration against Adhook is dynamic via JavaScript.
This scenario occurs frequently and is accordingly challenging to depict. The funnel mapping within Google Analytics only allows the data of pages. We can also describe dynamic actions with page visits, i.e. with so-called virtual page views.
- Value: We give the registration a value.
- Trichter: Here the conversion tunnel is shown. For each step to the defined target, the name of the step and the page is defined.
-
We choose the following values for the attributes (including funnel).
- Destination: /vpv-register-free-trial
- Value: $0 (Micro-Conversion)
-
Funnel: On
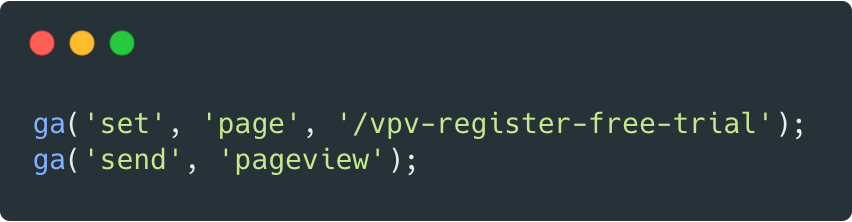
- Step 1: Visit Landing Page /vpv-start
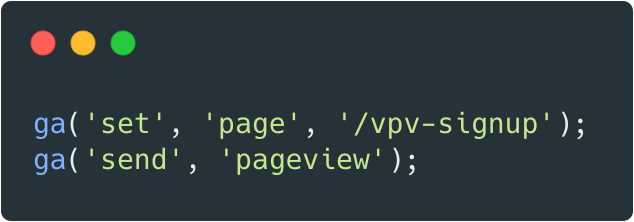
- Step 2: Visit Sign-Up Page /vpv-signup
- Step 3: Register for Free Trial /vpv-register-free-trial
- Note: We list all page views as Virtual Page View (vpv prefix). You can also store static URLs here (more common).
-
Subsequently, the goal with the funnel is saved and immediately receptive to the defined (virtual) page visits.
-
Goal: Definition of the target page
5. How do I trigger page visits or events for the Google Analytics Conversion Funnel?
As shown in the previous chapter, the target action type "Destination" supports page views. If you have static URLs, such as /index.html → /announcement.html → /thanks-for-announcement.html you don't have to do anything on the "technical" side of the website or app. The URLs must simply be stored correctly in the funnel configuration.
If you have dynamic actions, as is the case with single-page apps, for example, you have to simulate so-called virtual page views.
In the following chapters we will show how we can track Virtual Page Views for the Conversion Funnel in Google Analytics with "raw" Google Analytics JavaScript Client and how tracking works with the Google Tag Manager.
📍 How can I track virtual page views with Google Analytics?
In order for Google Analytics to work at all on your own website or web app, the Google Analytics tag or script must be integrated. This is the basis for tracking in Google Analytics. Google describes on your support page well how to set up the Google Analytics tag on your landing page or web app.
Now it gets a little technical. This is that these "Virtual Page Views" can be communicated via JavaScript versus Google Analytics. To do this, you have to call the following JavaScript function when you perform the corresponding action on the website or in the app:
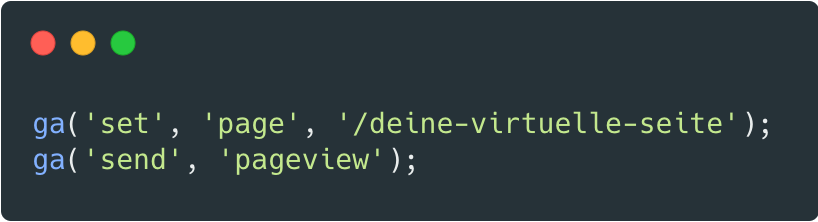
The ga(...) function is created by embedding the Google Analytics tag and made globally available by the Googl Analytics script after loading.
In the context of the upper funnel we now resolve the following function calls:
- Visit Landing-Page
- Visit Sign-Up Page
- Registration free trial
More information about tracking virtual page views with Google Analytics can be found in this Post.
📍 How can I track virtual page views with Google Tag Manager?
Because we have some tags in use we use the Google Tag Manager. We have already written a guide for this.
As a supplement to our article we describe in this guide the implementation of virtual page view tracking with the Google Tag Manager.
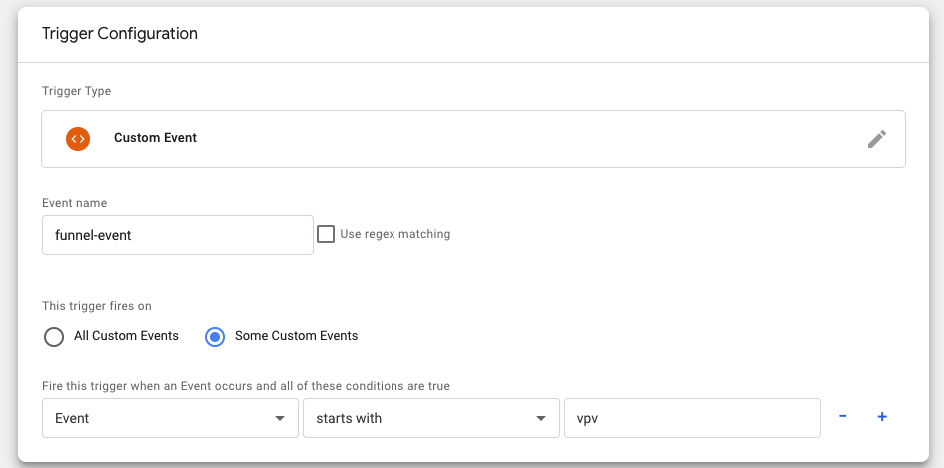
Here's what we did:
- Create a new trigger that triggers the Virtual Page View
- Select custom event
- Define event names and specify custom events (e.g. vpv- prefix, for Virtual Page View)
- Then create a new tag configuration
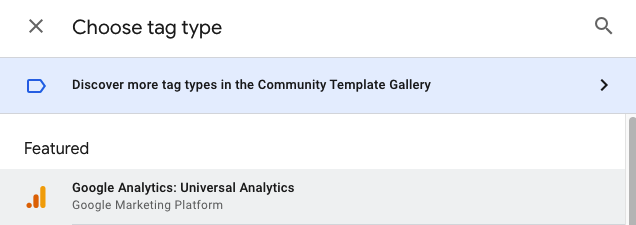
- Select the tag type → Google Analytics: Universal Analytics
- Select the tag configuration
-
The trigger must be the trigger created earlier. So that the value
{{New History State}}above can be used.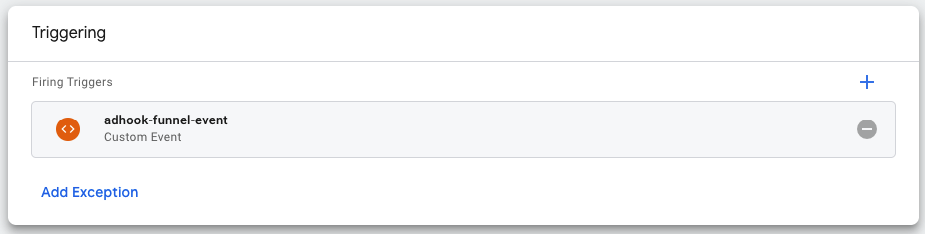


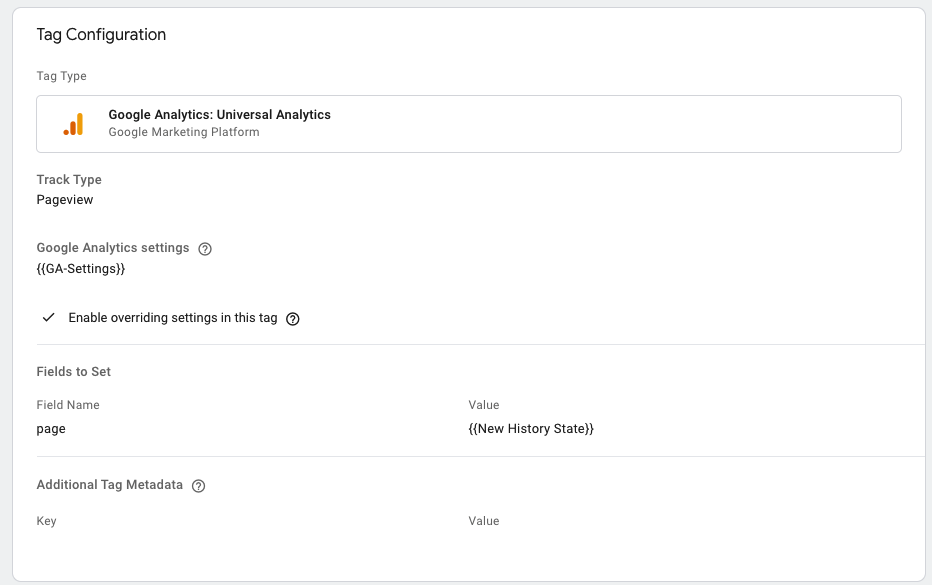
At the configuration above the value {{New History State}} is stored in the Page field and can be tracked as Virtual Page View.
As soon as the new Google Tag Manager configuration is rolled out, the Google Tag Manager is receptive to the virtual page views.
Since you no longer communicate directly with Google Analytics, you have to use the Google Tag Manager JavaScript Client. The call via Google Tag Manager Events looks like this:
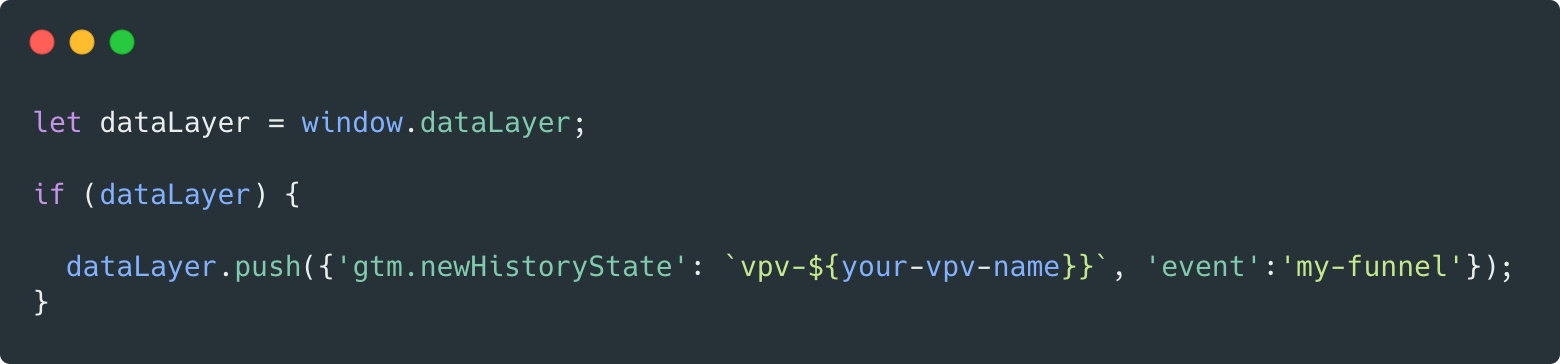
Technical background: After the Google Tag Manager has been loaded, the object dataLayer is available on the window object and can be fired with corresponding objects or events via push function.
If the virtual page views do not arrive correctly in Google Analytics, we recommend the following troubleshooting tools:
📍 Google Tag Manager “In Preview”
As soon as this option is activated, a troubleshooting window of the Google Tag Manager will appear when the corresponding website or web app is called, with which you can check which tags were triggered.
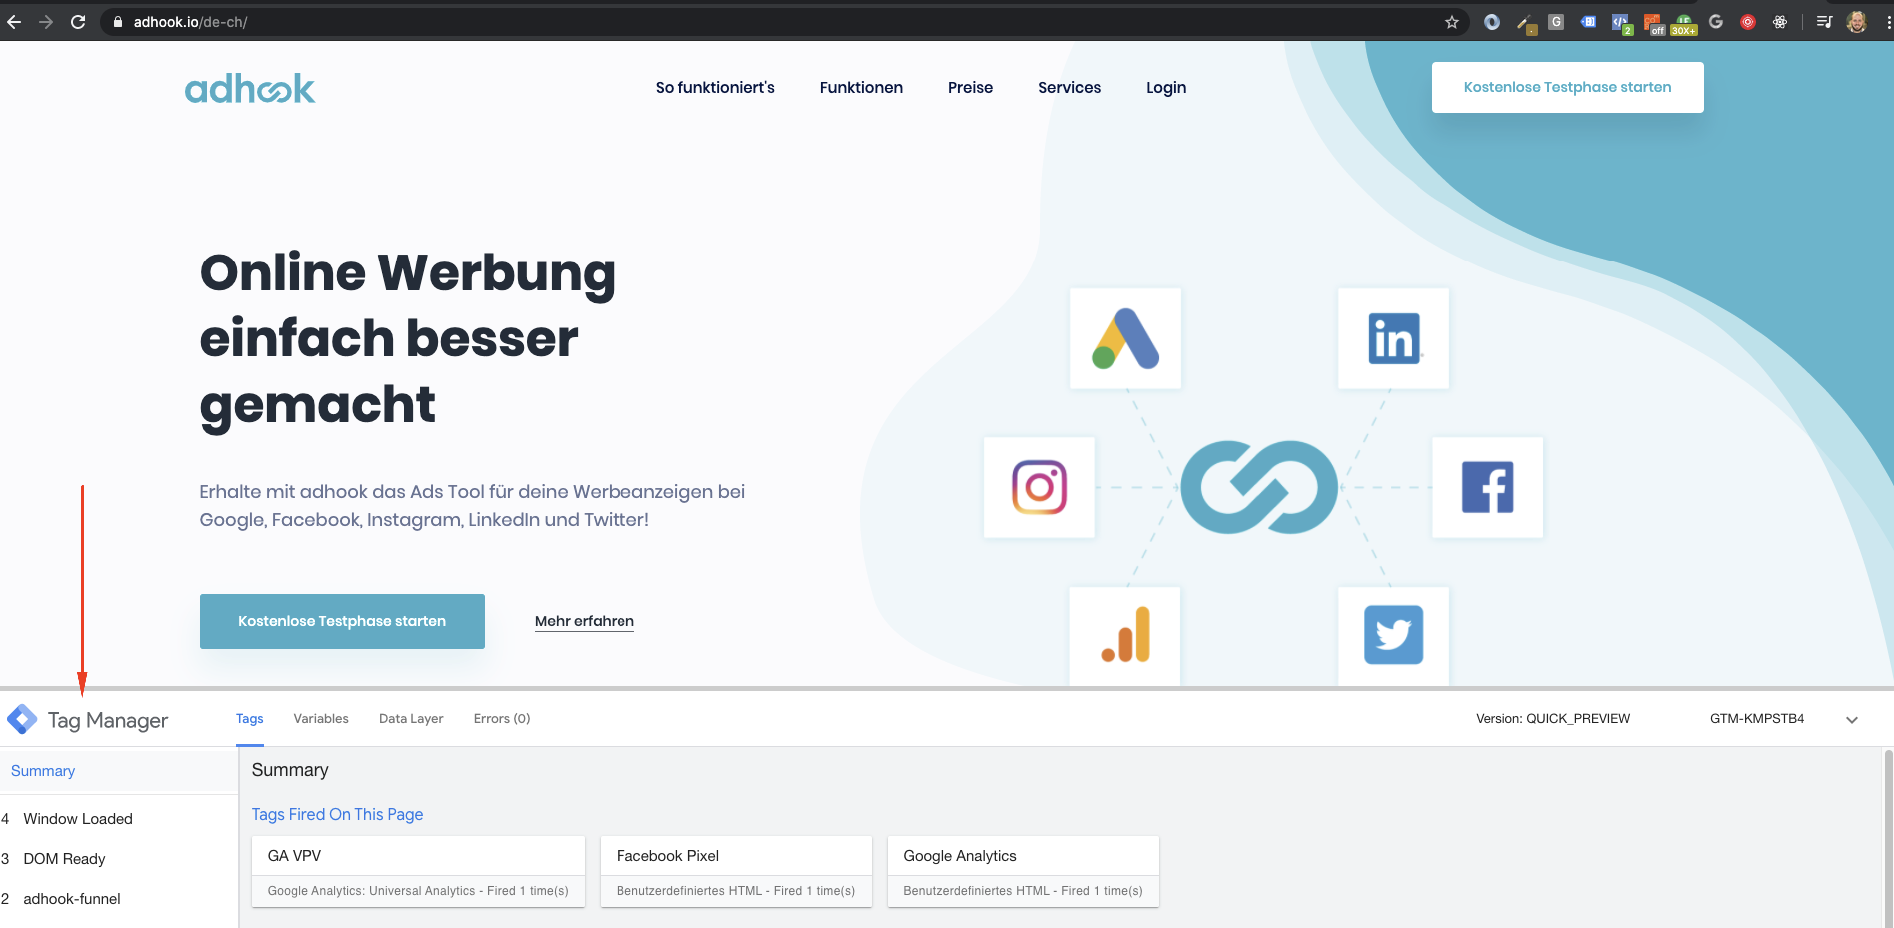
📍 Tag Assistant
The Tag Assistant is available as Chrome-Extension.
6. How do I measure conversions with the Conversion Funnel from Google Analytics?
As soon as the corresponding page views are correctly tracked against Google Analytics, the steps for conversions can be evaluated in Google Analytics with the newly created conversion funnel.
The Conversion Tunnel is opened as follows:
- In the Google Analytics Funnel via Conversions → Goals → Open funnel visualization
-
Afterwards you can view the newly created funnel. In the following graphic we have marked certain elements (blue), which we explain in the following.
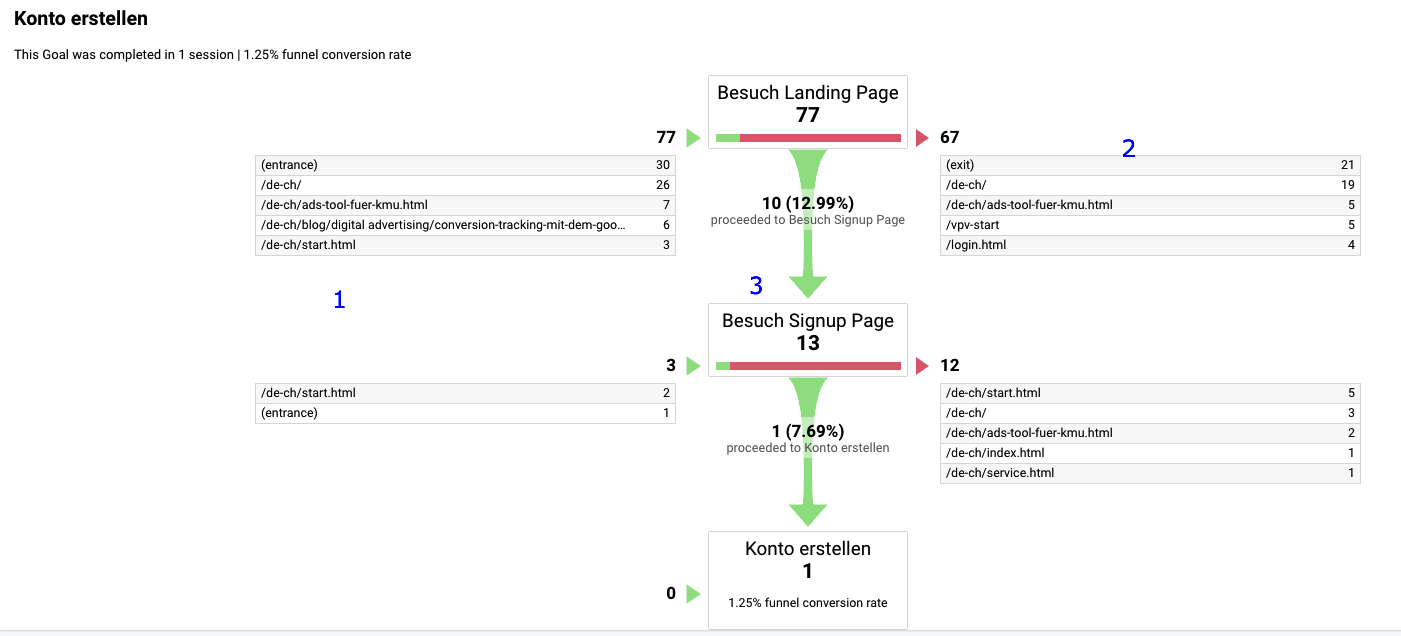
The funnel of this micro-conversion shows the following interesting insights (legend blue):
- Entry-Site where the user enters the Conversion Funnel from
- Bounce-Site at every turn of the tunnel
- Bouncerate per step in the funnel
Based on the funnel data you can now check your own conversion steps and improve them if necessary.
The following Youtube video shows three additional ways to view the funnel in Google Analytics:
7. The Google Analytics target project or the Conversion Funnel does not work
During the implementation of the Conversion Funnel in Google Analytics we encountered several problems. We would like to share these issues and the corresponding solutions in this article.
📍 My Conversion Funnel shows 0 conversions even though there have been conversions
After the implementation of the Conversion Funnel one waits anxiously for the first data in the funnel.
Attention: Google Analytics Latency of data processing
The processing latency in Google Analytics is between 24 and 48 hours. This means that it is possible that conversions or even radio data are not or incompletely displayed during this time span.
In our example, the page views (including conversions) were displayed in other views during this time, but not in the funnel. Only after a certain time did the data appear in the funnel.
Troubleshooting:
- Check if the page views are tracked or virtual page views are fired
- Check in Google Analytics sporadically during this time window if there is already data (even if incomplete). For example, use the view under Behavior → All pages and filter for the tracked pages.

- Check that you have selected the correct time window. By default, the current day is not selected in the date selection.
You can find further information on data processing latency from Google Analytics at this Link at Google
8. Alternatives to Google Analytics for conversion tunnels
In addition to Google Analytics, there are of course some manufacturers that specialize in the funnel theme and offer additional functionalities around the funnel theme.
In the following list we would like to show you different alternatives to the Conversion Funnel in Google Analytics:
📍 hotjar

Here go to hotjar.
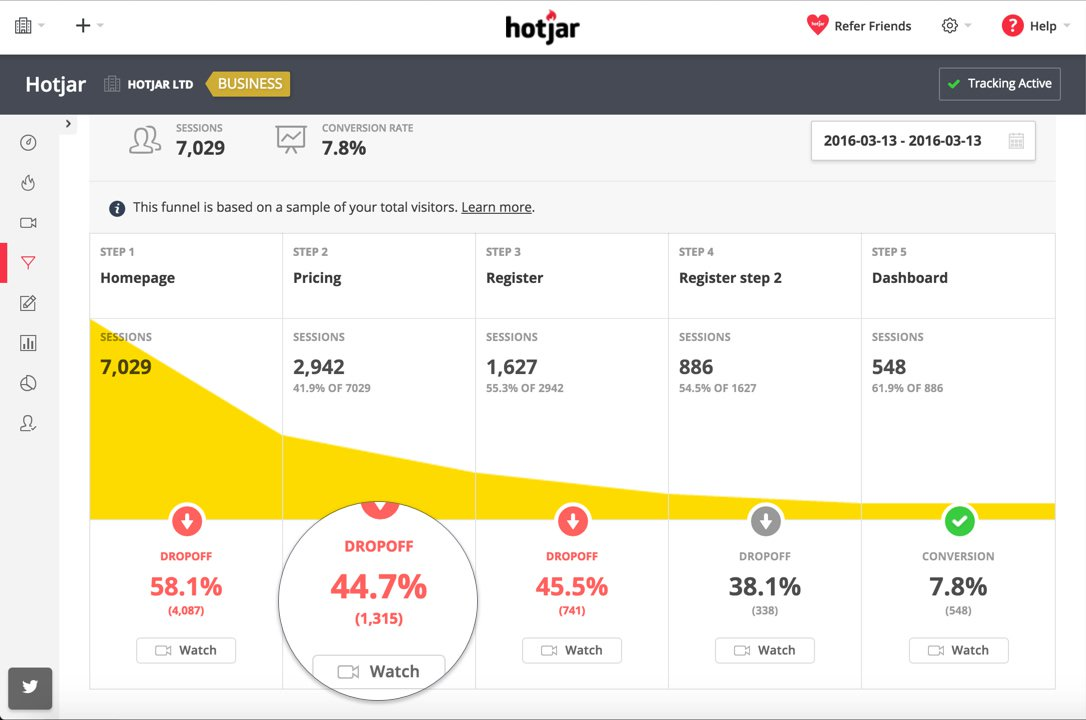
hotjar has also specialized in web and usability analysis. They also offer the mapping of conversion funnels. The additional advantage of hotjar compared to Google Analytics in the area of conversion funnels is that you can view the individual jumps with so-called dropoff recording. Besides the Conversion Funnel, hotjar offers usage heat maps, visitor recordings, form analysis, feedback polls and surveys. It is worthwhile to have a look at hotjar. Besides page views, virtual page views can also be tracked.
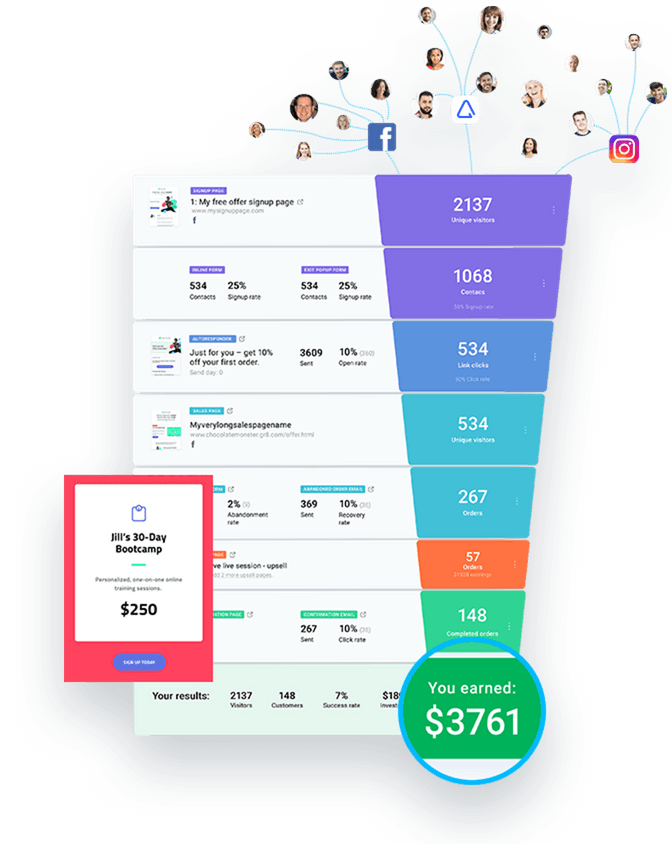
📍 GetResponse

Here go to GetResponse
We came across GetResponse within the framework of the recommendation of Neil Patel. He propagates the All-In-One Tool GetResponse in his Youtube Video. GetResponse has specialized in e-mail marketing, but also offers the mapping of conversion funnels. The interesting thing about GetResponse is that they offer many tracking options above the funnel, such as what comes back from e-mail campaigns, webinars, etc.
Do you need support in the conception and illustration of marketing funnels? We are at your disposal! Get in touch with us via +41 41 349 36 73 or hi@adhook.io.