Setup Conversion-Tracking in Google Tag Manager | Ultimate Guide
Conversions from digital advertising campaigns can be measured easily, flexibly and without programming knowledge with the Google Tag Manager. Learn in this guide how Google Tag Manager works and how you can integrate conversion tracking events for the biggest Search & social advertising networks in just a few steps!
The guide is divided into the following chapters
- 1. What is Conversion Tracking?
- 2. The Google Tag Manager (GTM)
- 3. Measuring Google Ads Conversions
- 4. Measuring Facebook Conversions
- 5. Measuring LinkedIn Ads Conversions
- 6. Measuring X Ads Conversions
- 7. Publish & Testing GTM Tags
- 8. Summary
1. What is Conversion-Tracking?
Valuable actions for your company are called conversions. A conversion can be, for example, subscribing to a newsletter, downloading an app or buying a product.
Conversion tracking helps you to measure the defined conversions and assign them to specific sources. This way you can find out whether a conversion resulted from a digital advertising campaign, a social media post or a direct visit to your website.
Learn more about Conversion-Tracking in our article How does conversion tracking work and why is it important for your marketing?
2. The Google Tag Manager (GTM)
To set up tracking tools or capture conversions, so-called code snippets must often be integrated. Adapting the source code for this purpose is time-consuming and error-prone. That's why there is the Google Tag Manager!
With the Google Tag Manager you can integrate code snippets from third parties without having to modify the source code. You only need to integrate the Google Tag Manager code once. Everything else can be controlled in your Google Tag Manager account.
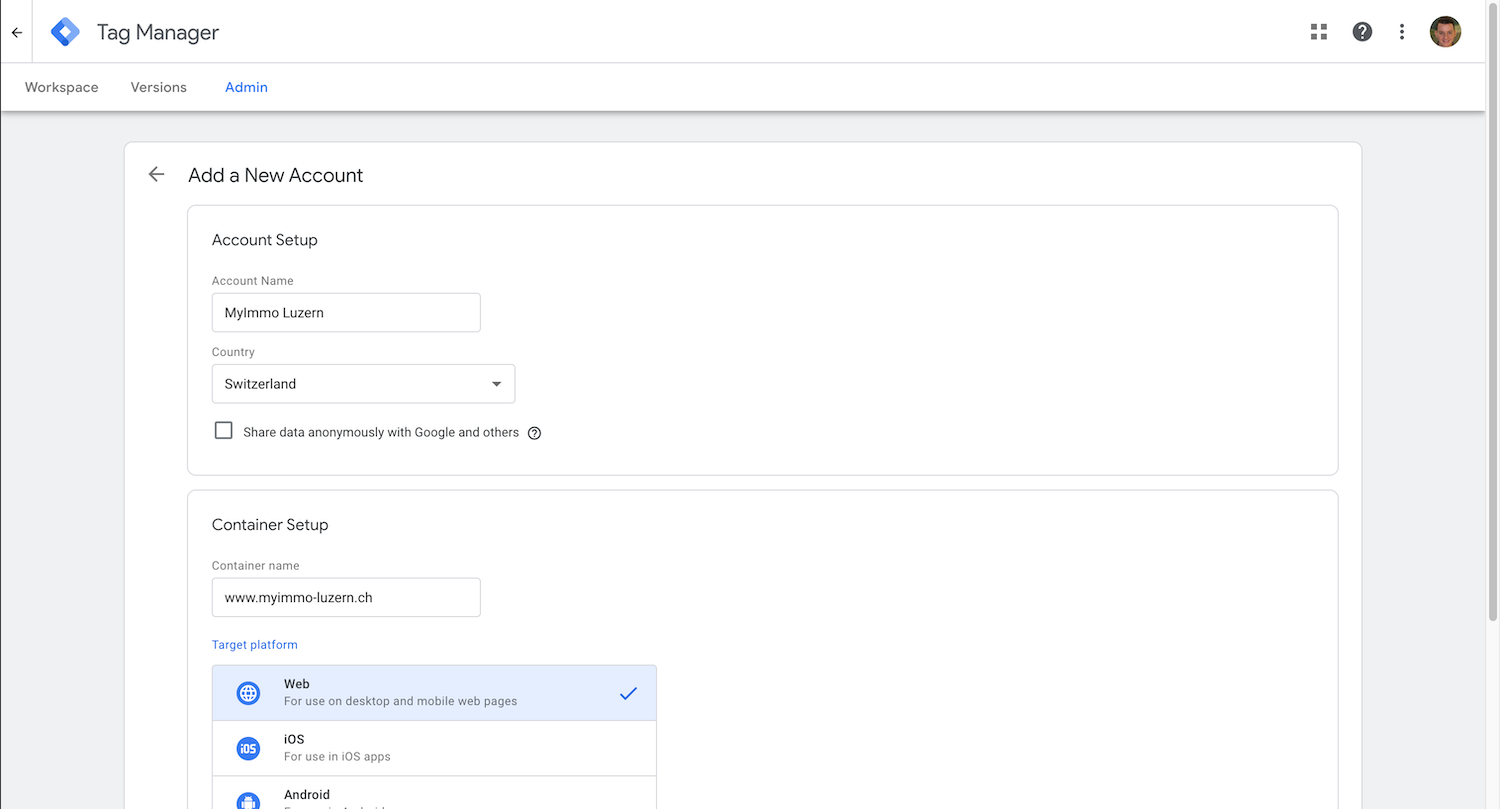
Setup Account & Container
On the Google Tag Manager website you can start creating an account.
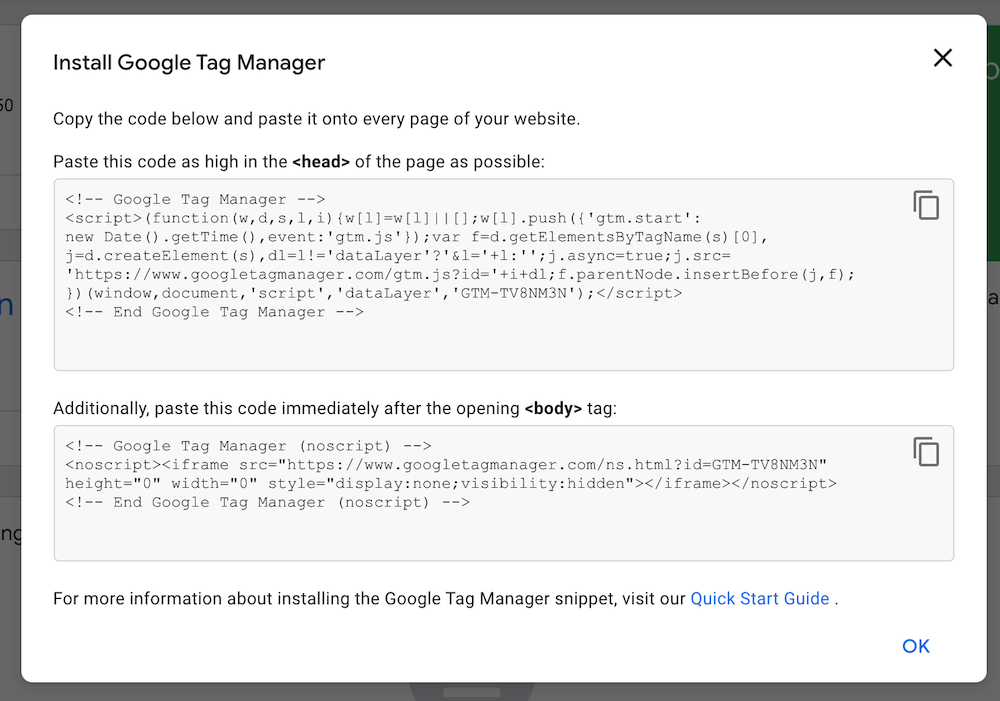
In addition to a name and the country, you create a first so-called container here. You can create one container per website or mobile app.
A code snippet is created for each container. This is the mentioned code snippet, which you have to install once. After that you can manage all other snippets as so-called tags directly in the Google Tag Manager.
Tags
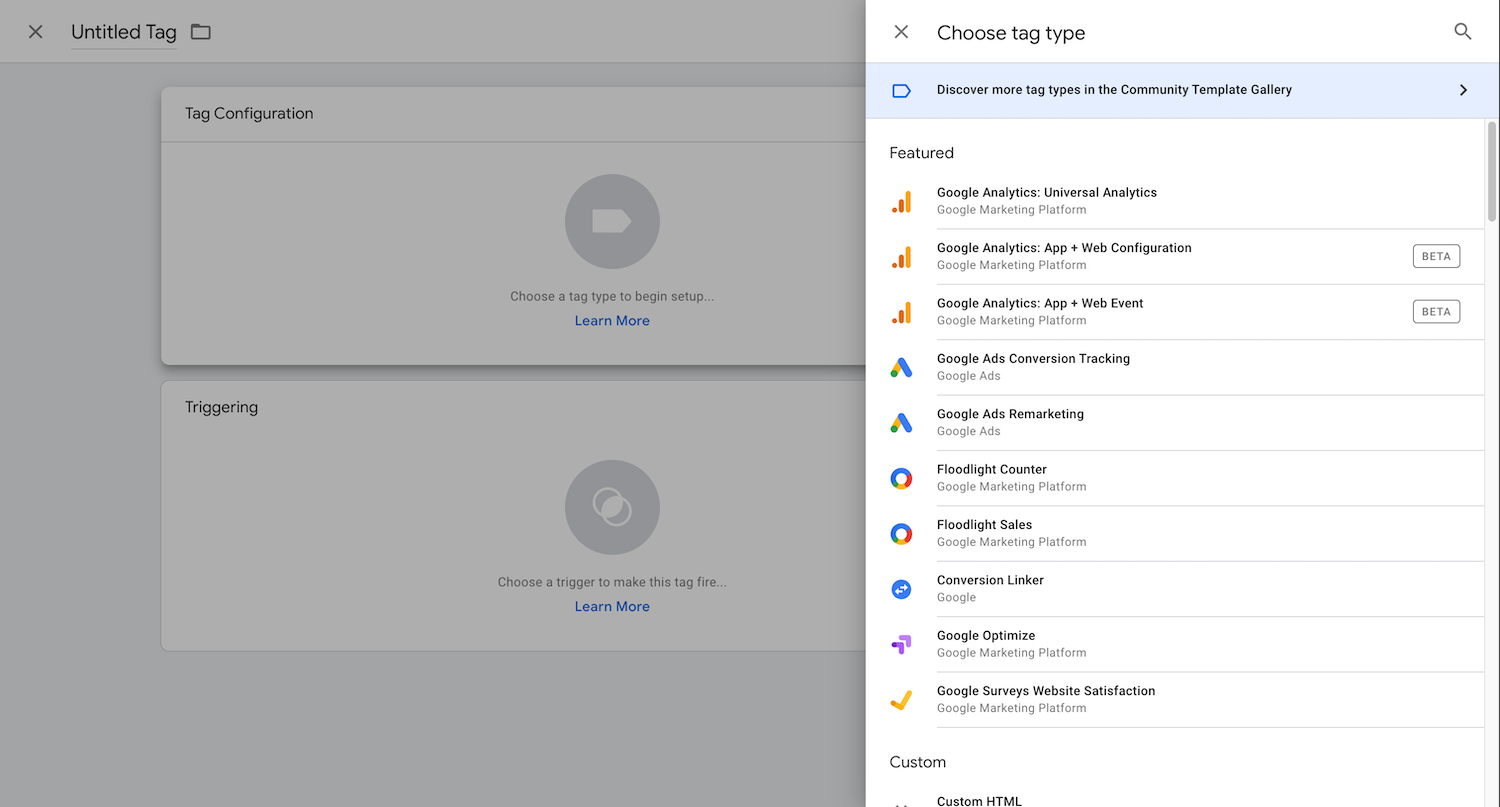
A tag is a third-party code snippet that you want to apply to certain actions on your website or mobile app.
When creating a tag in Google Tag Manager, you must select a tag type. You have a wide range of predefined tag types available, which you can use directly with a corresponding configuration. For individual tags you can choose the type "Custom HTML" or "Custom Image".
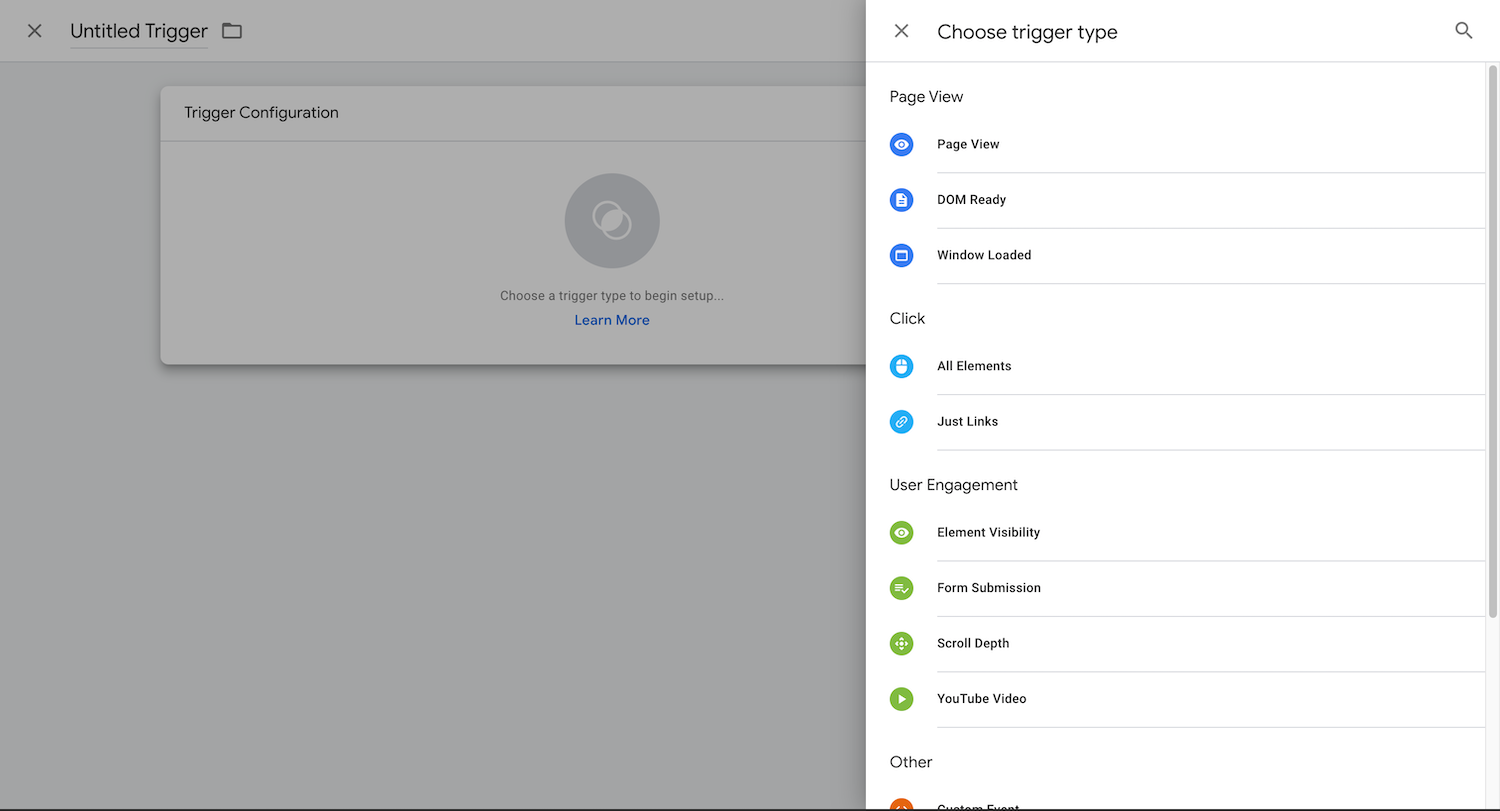
Triggers
With a trigger you can define in the Google Tag Manager when a tag should be triggered. When creating tags, one or more triggers must be selected.
The trigger "All Pages" is available by default to trigger a tag for each page of your website or mobile app.
To create your own triggers you have to select a trigger type. As with the tags, there are several predefined types available. For example, you can use the trigger type "page views" to define rules for which page views should trigger stored tags.
3. Measuring Google Ads Conversions
To create a Google Ads conversion and measure it via Google Tag Manager, you can proceed as follows:
Linking Google Conversions
Before you can measure the Google Conversion Event, you must integrate the so-called "Global Site Tag" on every page of your website. With the Google Tag Manager this is very easy by creating a so-called "conversion link". Proceed as follows:
- Create a tag of the type "Google Conversion Link" in the Google Tag Manager. This tag template requires no further configuration.
- Select the existing trigger "All Pages" to trigger the tag on every page.
Measuring Google Conversion Events
- Open your Google Ads account and go to "Tools and settings" - "Conversions".
- Create a new conversion and select the desired type (e.g. website to record actions on your website).
- Select the category and define a name for your conversion.
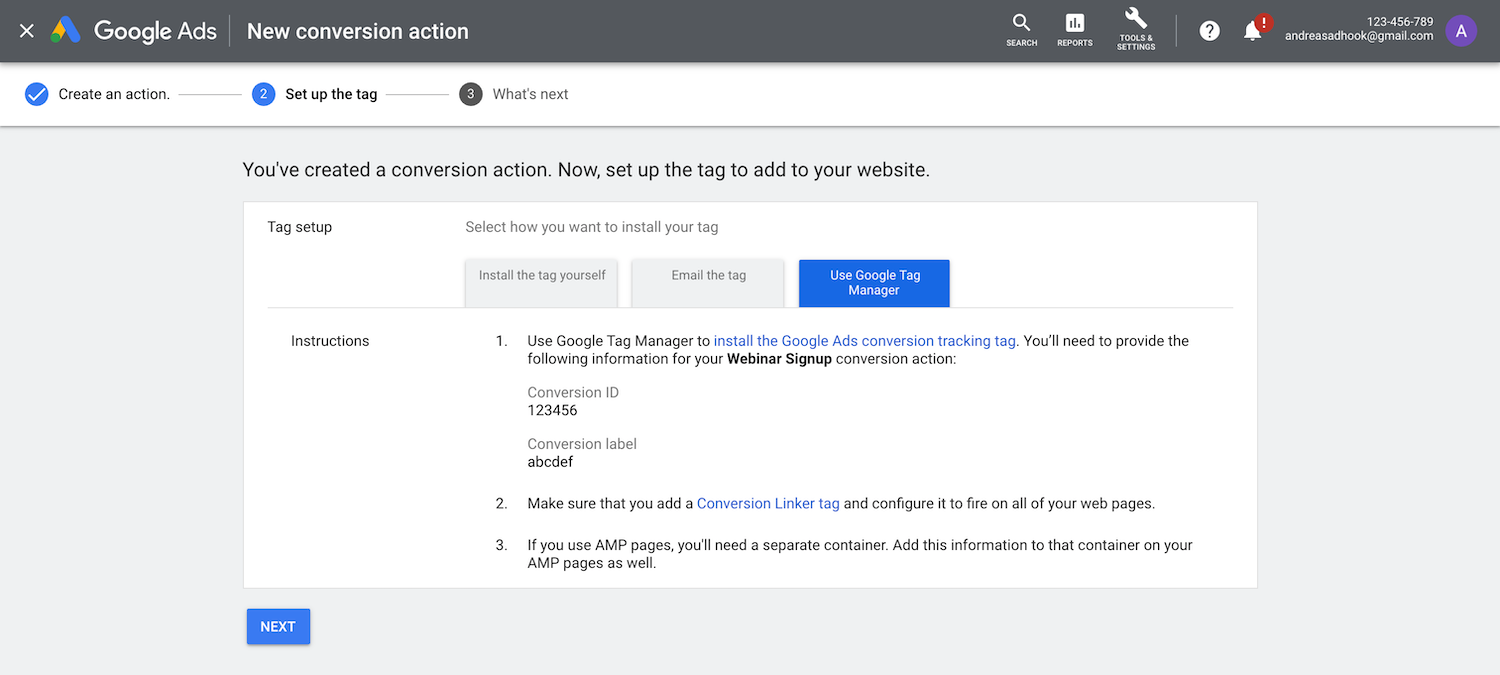
- With a click on "Create and continue" you get to the tag setup.
- Select "Use Google Tag Manager" here and copy the conversion ID and label.
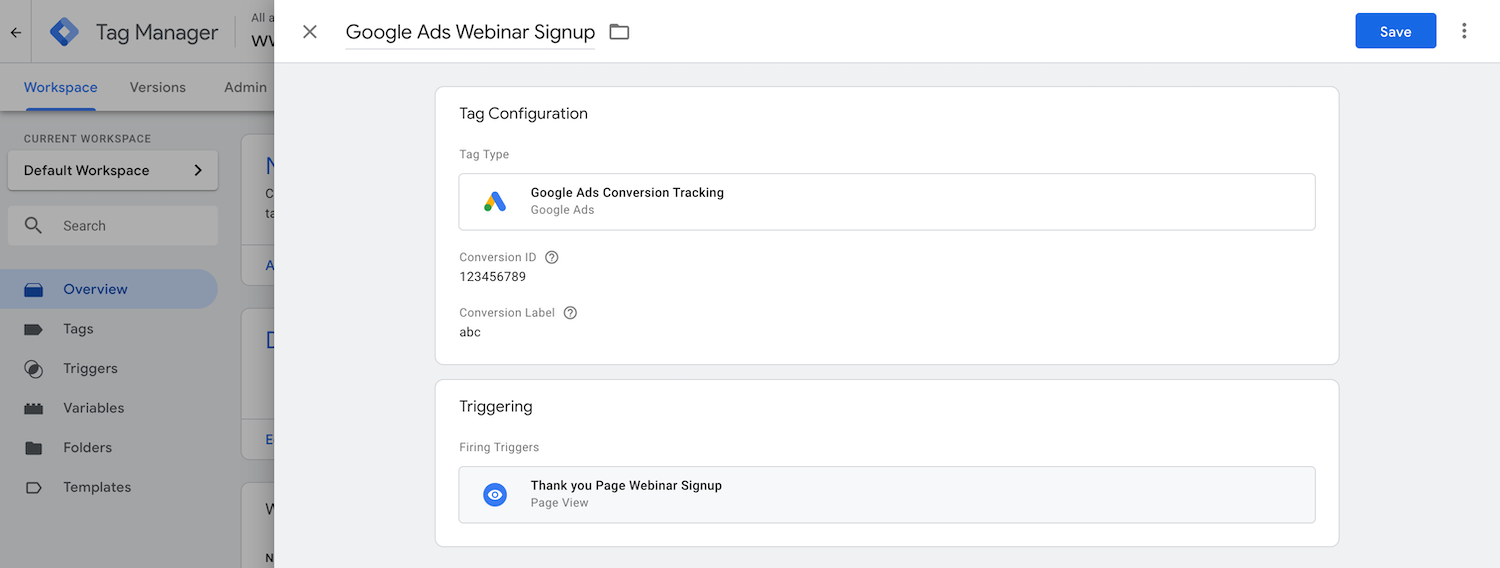
- Switch to the Google Tag Manager and create a tag of type "Google Ads Conversion Tracking". Enter the conversion ID and label for the Google Ads conversion you created. Entering a conversion value, order number, or currency code is optional.
- Create a suitable trigger or select an existing one to determine when the conversion should be triggered.
4. Measuring Facebook Conversions
Installing Facebook Pixel
To measure conversions triggered via Facebook, the so-called Facebook pixel must first be integrated. To do this, go through the following steps:
- Open the Facebook Events Manager and click on "Create pixel". If you have already created a pixel, open the details of your pixel.
- Click in the details of the pixel on "Set up" - "Install code manually" and copy the whole pixel code.
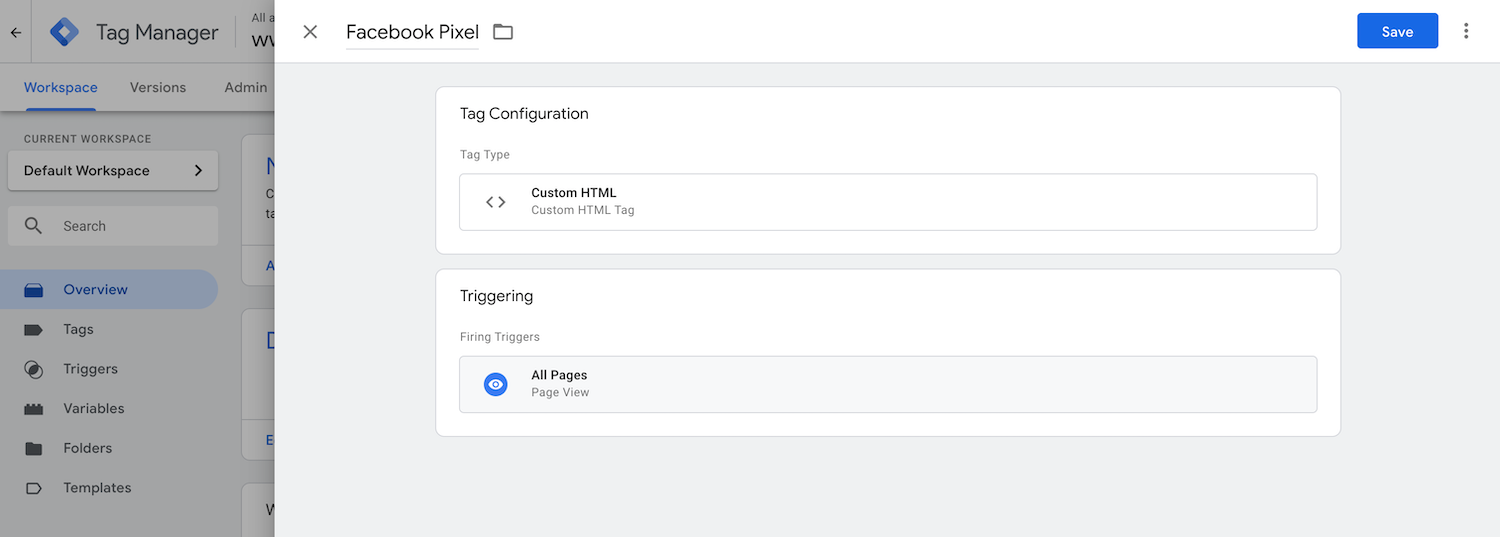
- Switch to the Google Tag Manager and create a new tag of type "Custom HTML" and the name "Facebook Pixel".
- Paste the copied code into the HTML container
- Click on "Advanced settings" and select "Once per page" under "Tag triggering options".
- Select the existing trigger "All Pages" so that the Facebook pixel is triggered on all pages.
Measuring Facebook Conversion Event
To create a Facebook conversion event based on the Facebook pixel and measure it via Google Tag Manager, you can proceed as follows:
- Open the Facebook Events Manager and click on details for your pixel.
- Click on "Set up" - "Set up new events".
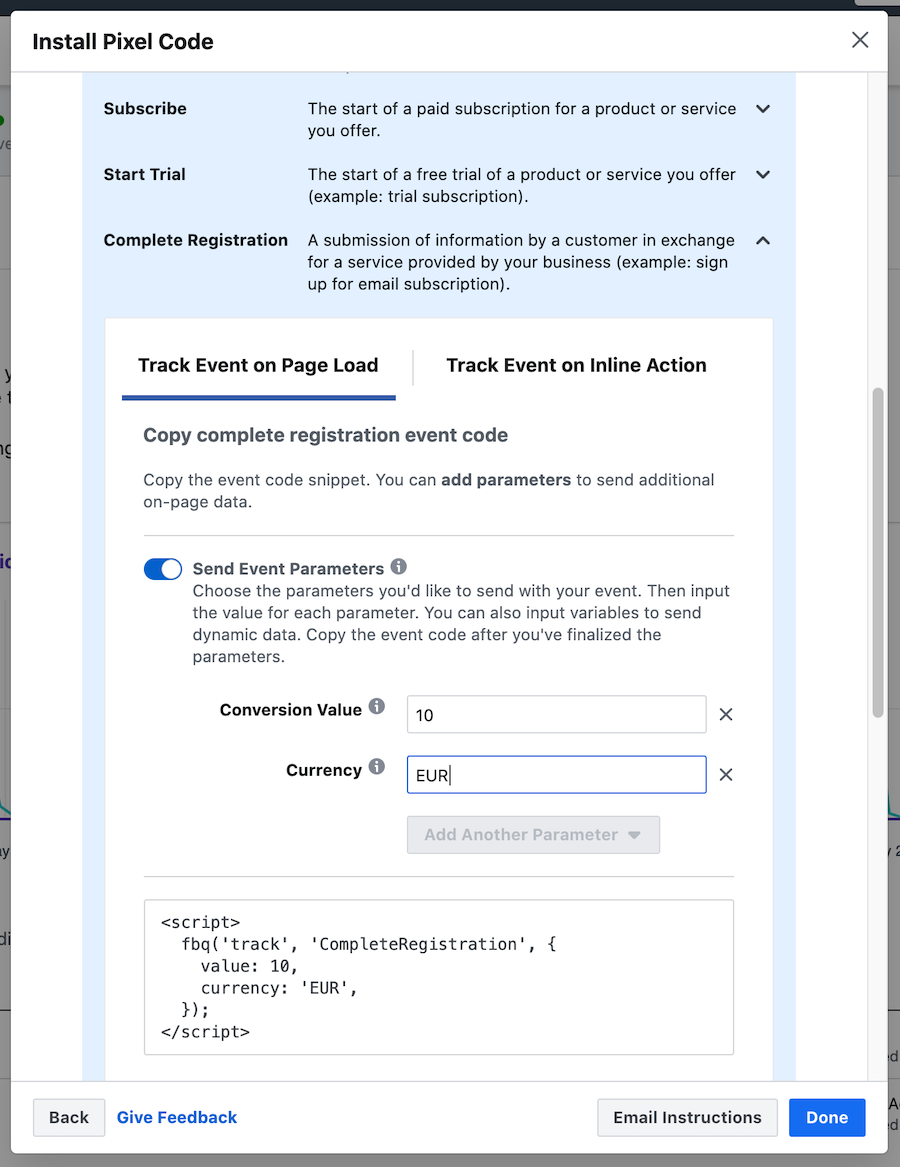
- After clicking on "Manually Add Event Code" you can select the desired event. For example, select "Complete registration". Here you can also specify further attributes for your conversion, such as the value of a registration.
- Copy the displayed code snippet.
- Switch to the Google Tag Manager and create a new tag of type "Custom HTML" with an appropriate name.
- Paste the copied code into the HTML container
- Click on "Advanced settings" and select "Once per event" under "Tag triggering options".
- Select at "Tag Order" that the new tag should be triggered after the "Facebook Pixel" tag is triggered.
- Create a suitable trigger or select an existing one to determine when the conversion should be triggered.

5. Measuring LinkedIn Ads Conversions
Installing LinkedIn Insight Tag
The LinkedIn Insight tag works similarly to the Facebook pixel and must also be integrated in front of the measurement of conversion events. You can do this as follows:
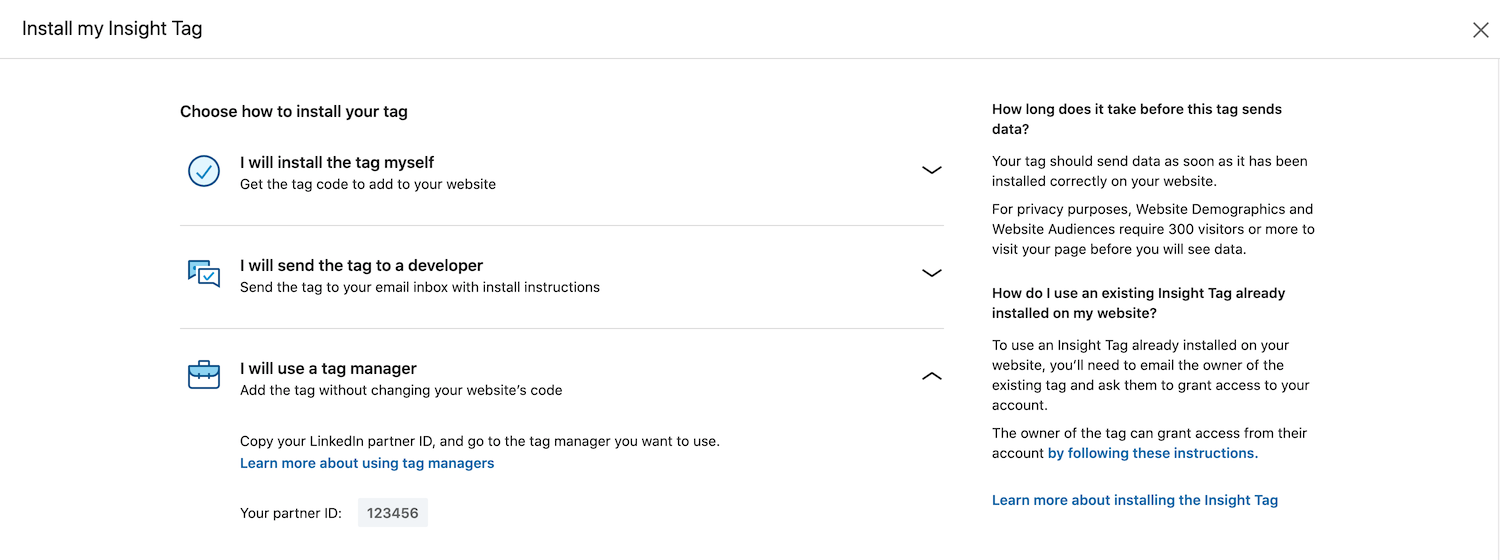
- Open your LinkedIn Ads account in the LinkedIn Ads Manager Then click on "Account Assets" - "Insight Tag" - "Manage Insight Tag" - "View Tag".
- Select "I use a Tag Manager" here, so that your partner ID is displayed directly. Copy this ID.
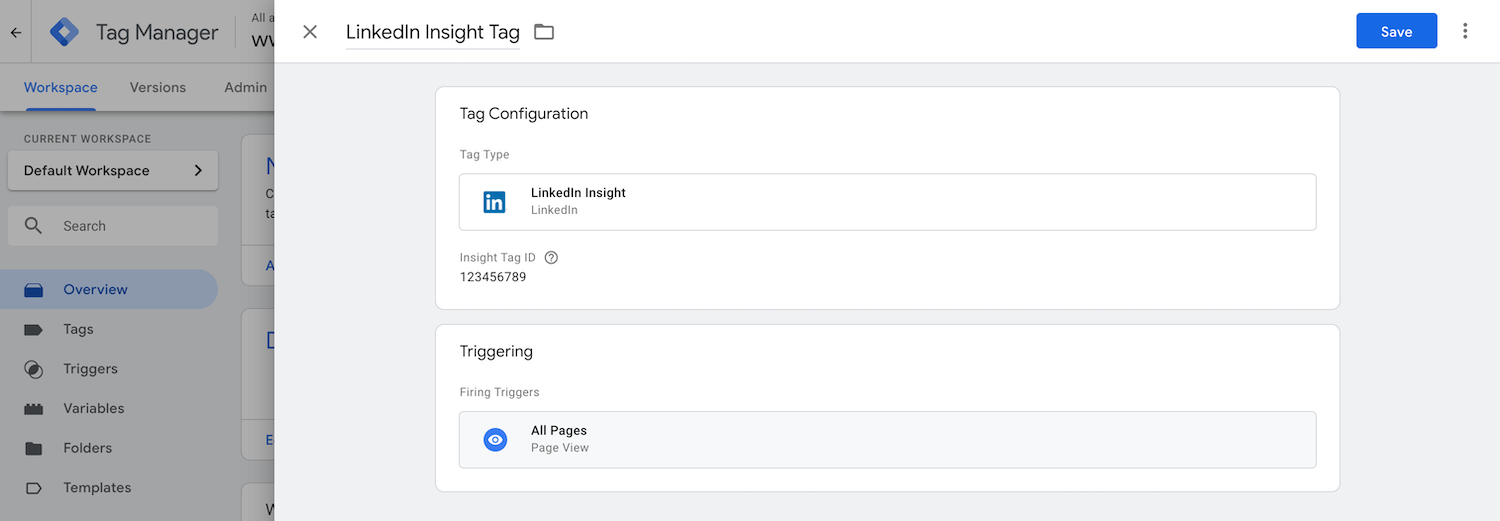
- Switch to the Google Tag Manager and create a new tag of the type "LinkedIn Insight" and the name "LinkedIn Insight Tag".
- Paste the copied ID into the "Partner ID" field.
- Select the existing trigger "All Pages" to trigger the LinkedIn Insight tag on all pages.
LinkedIn Page-View based Conversion Events
With LinkedIn a conversion can be measured directly via the Insight tag. You can do this as follows:
- Open your LinkedIn Ads account in the LinkedIn Ads Manager Then click on "Account-Assets"- "Conversions".
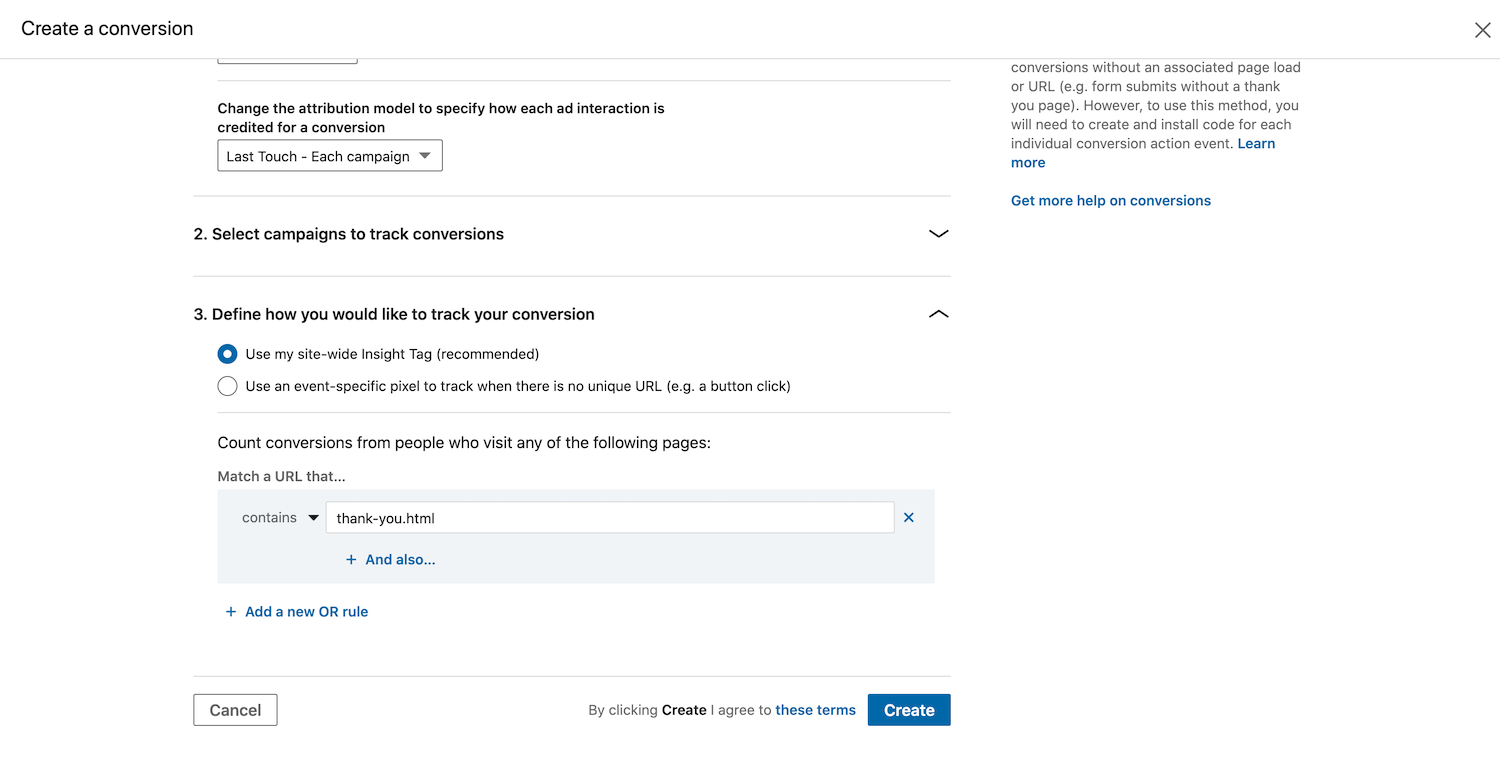
- Click on "Create Conversion" and give the conversion a name.
- Select the type of conversion (e.g. register) and optionally define a conversion value.
- Select one or more LinkedIn campaigns that you want to assign to this conversion.

- When tracking the conversion, select "Use my Insight tag" and define a rule on which page view the conversion should be triggered. As an example, you can configure here that the conversion should be triggered on all pages that contain "thankyou.html".
- That's it! With this form of conversion creation in LinkedIn Ads you don't need to do any further configuration in the Google Tag Manager. The Insight tag, which you have already integrated via the Google Tag Manager, will trigger the defined conversion.
LinkedIn Event-based Conversion Events
Do you want to capture LinkedIn conversions for which you cannot specify an explicit page as a trigger? Then you can create these as so-called "event-based" conversions in LinkedIn. Follow these steps to create these types of conversions in LinkedIn Ads and measure them via Google Tag Manager:
- Create a LinkedIn Conversion as described in the chapter above. When tracking the conversion, select "Action specific pixel". You will now be shown a code snippet which you must insert as soon as the action is performed by the user.
- Copy from code Snips the URL that appears after "src=" (e.g. https://px.ads.linkedin.com/collect/?pid=ABC&conversionId=123&fmt=gif)
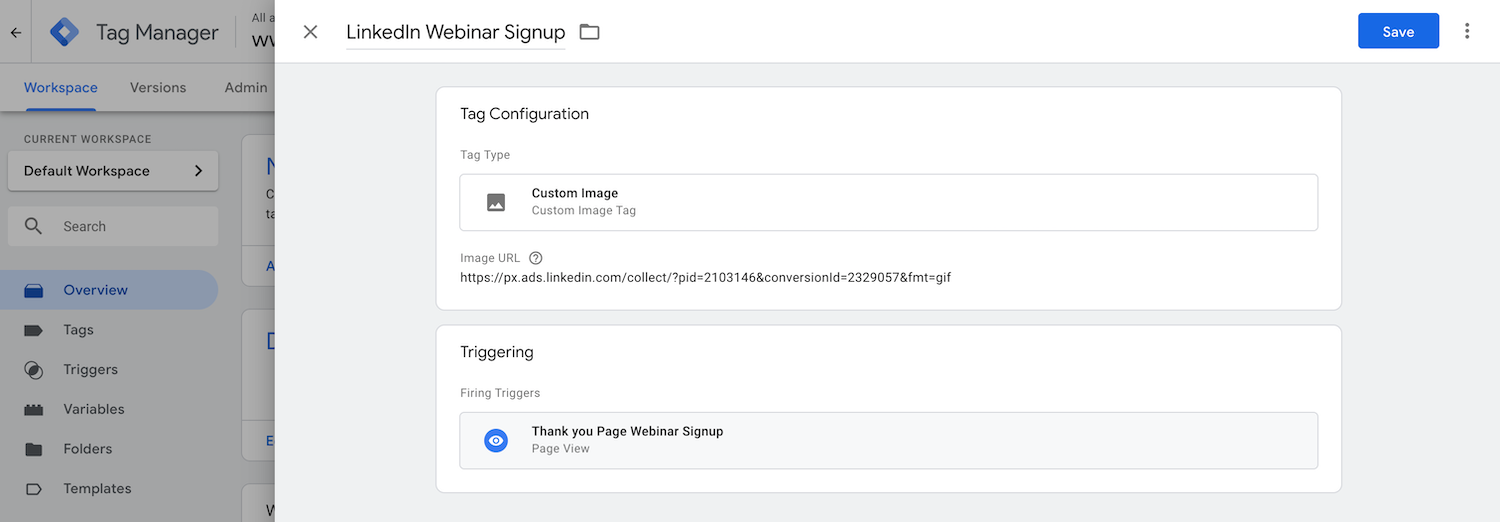
- Switch to the Google Tag Manager and create a new tag of type "custom image" with a corresponding name.
- Paste the copied URL into the "Image URL" field.
- Select at "Tag Order" that the new tag should be triggered after the tag "LinkedIn Insight Tag" is triggered.
- Create a suitable trigger or select an existing one to determine when the conversion should be triggered.
6. Measuring X Ads Conversions
Proceed as follows to create a X ad conversion and measure it via Google Tag Manager
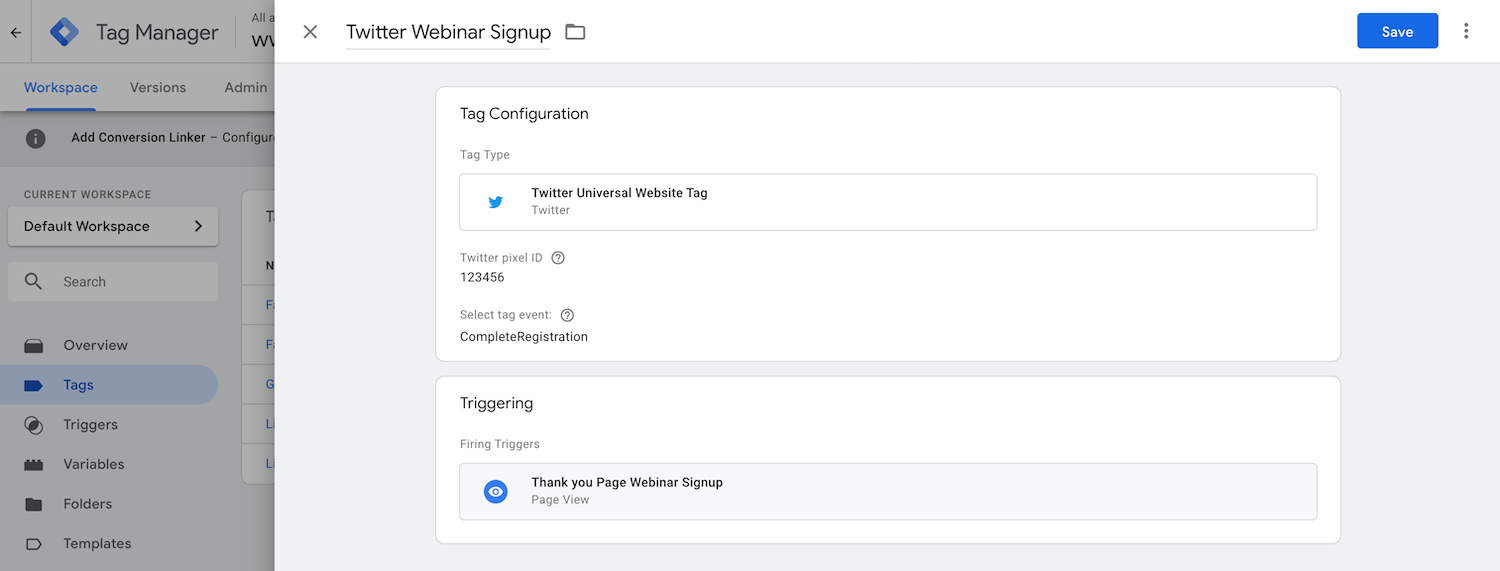
- Open your X Ads account and go to "Tools" - "Conversion Tracking".
- Click on "View code and installation instructions".
- In your Universal Website Tag Code Snippet you will find the ID as "txn_id". It is five characters long and consists of letters and numbers. Copy this ID.

- Switch to the Google Tag Manager and create a new tag of type "X UniversalWebsite Tag" with an appropriate name.
- In the Google Tag Manager you can now insert the ID in the field "X Pixel-ID".
- Choose an appropriate event that matches your conversion.
- Create a suitable trigger or select an existing one to determine when the conversion should be triggered.
7. Publish & test GTM Tags
Tags created in Google Tag Manager are not immediately active. Click "Submit" to publish the changes you have made. By clicking "Preview", you can test your changes without publishing them to everyone.
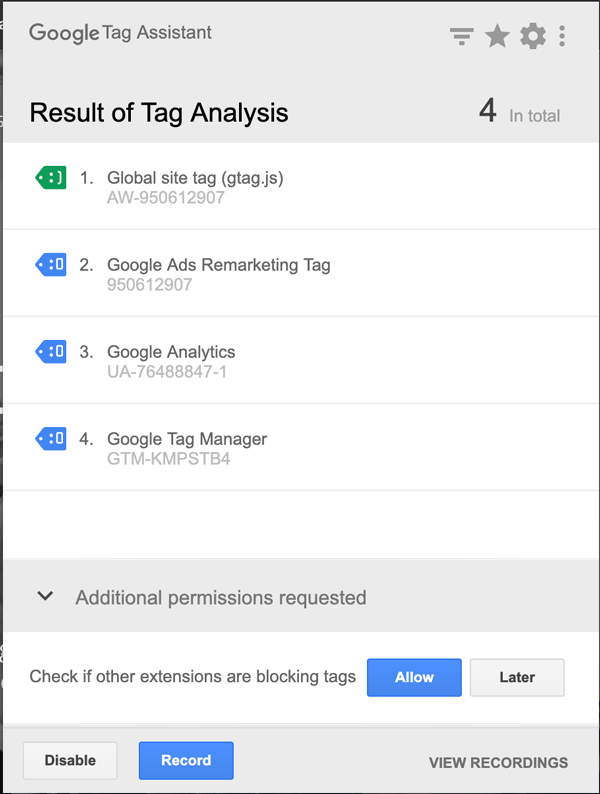
The Google Tag Assistant
The easiest way to test created tags and triggers is the plugin Tag Assistant (by Google) for Chrome Browser.
The Tag Assistant shows you which tags are active on your page and when e.g. a conversion tag is triggered. To do this, play through a conversion action and check in the GoogleTag Assistant whether the created tags were actually triggered.
8. Summary
With the Google Tag Manager, the integration of conversion events from digital advertising campaigns can be controlled easily and flexibly. The extensive possibilities in configuration and testing make Google Tag Manager a powerful tool for
Do you have questions about conversion tracking or the Google Tag Manager? Let us know, we are looking forward to hearing from you!